Welcome!
 Hi, I'm Tori! Welcome to Healthy Plate Happy Family!
I am a fun-loving, healthy-eating, wife, mom, holistic
nutrition student, aspiring yogi, SUP-enthusiast, living
and loving life on the beautiful coast of West Michigan.
Here you'll find all of the whole foods, clean-eating recipes
that I am cooking up to keep my family happy and healthy!
Thanks for stopping by!
Hi, I'm Tori! Welcome to Healthy Plate Happy Family!
I am a fun-loving, healthy-eating, wife, mom, holistic
nutrition student, aspiring yogi, SUP-enthusiast, living
and loving life on the beautiful coast of West Michigan.
Here you'll find all of the whole foods, clean-eating recipes
that I am cooking up to keep my family happy and healthy!
Thanks for stopping by!


So after a couple of “Thursday Night Pizza Nights” this crust has officially been deemed blogworthy!!!!

If you are new to the blog, we have a family tradition (for the past 6? 7? years) to make pizza every Thursday night. I almost always make homemade whole wheat crust, unless we are in a huge time crunch. Then I will occasionally buy the store-bought 100% whole wheat organic crusts.
Our homemade crust is very good and we all love it. It’s especially great when you throw it on the grill! But I am always on the lookout for something a little lighter and more nutritious since we eat it every week. I have used everything from an Ezekiel clean-ingrediet pocket bread to these Millet and Flax Lavash flatbreads. I have also tried cauliflower crusts, just out of curiosity, since they seem to be crazy popular around the blog and Pinterest world. But, honestly, I just didn’t dig them.
Then I ran across a photo of an Eggplant crust and decided to give it a try. WOW! Instant obsession!!!!

To be honest, they are a little work. But you can make a bunch at one time and freeze them. I promise the taste is amazing!!!! Don’t expect it to be a “bread-y” replica of doughy pizza crust. It is a different texture. But still a healthy, tasty way to enjoy pizza!!
If you give this a try, please let me know what you think!!! I would love to hear if you like it as much as me 

Eggplant Pizza Crust (paleo, grain-free, gluten-free, dairy-free)
Ingredients
1 whole eggplant
1/4 cup almond meal or almond flour
2 T. coconut flour
2 T. ground flax, flaxmeal, or ground chia seeds
1 egg
1 tsp. Italian seasoning
1/2 tsp. sea salt
1/2 tsp. garlic powder
Olive Oil or Parchment Paper (this crust is sticky!!!!)
Directions
Preheat oven to 375 degrees.
Peel the eggplant. This may be easier if you slice the eggplant into a couple of big chunks. Then grate the eggplant with a cheese grater – be prepared to get your arm workout for the day!!!
Put the pile of shredded eggplant into a couple of paper towels or cheesecloth, if you have it, and wring out all of the excess moisture. Do NOT skip this step!
Place eggplant and other ingredients into a bowl and mix well.
Grease a pan very well with olive oil or lay down a sheet of parchment paper.
Place the pizza “dough” onto the pan and shape into a thin round crust.
Bake for 20 minutes.
Flip over and bake for an additional 20 minutes.
At this point, you can freeze the crust. Or top with desired toppings and bake for an additional 10-15 minutes. Broil, if necessary, to get the cheese slightly browned and bubbly.
**Notes – I doubled this recipe and made it into 3 personal-pizza sized crusts since I’m the only one that eats these. Darren gave them the thumbs up approval, but he prefers his regular pizza
This past Spring Break, we took a family trip out to California….and pretty much fell in love with it. We especially loved Southern California! Luckily, being in the Stand Up Paddleboard business, we have a lot of opportunities to travel out there. Actually, Darren just spent a week in Laguna Beach and Coronado for some meetings, networking, and a race. I loved seeing all of the pictures, but was kind of bummed that I didn’t get to make the trip with him this time. I shouldn’t complain too much since we have some pretty awesome beaches and trails near us. Whenever I need my “beach fix” I just head across the street to this….

Today was the perfect day for a jog on the trails –

running the stairs-

and a cool down walk on the beach –

Ending with a few yoga poses since I missed my usual class this morning.

I was definitely ready for lunch by the time I got home! It only seemed fitting to make this quinoa salad inspired by the flavors of California. My fellow SUP and yoga-loving friend made this for me this summer and I completely forgot about it until just recently.
It’s a lot of chopping…..

But I promise it’s worth it!

California Quinoa Salad
Ingredients (amounts are estimates, use more or less based on your taste preference!)
1 cup quinoa (red, white or a mix)
1 ripe mango, diced
1/4 large red onion, finely chopped
1/2 red pepper, chopped
1/2 cup pre-steamed or frozen edamame (shelled)
1/2 cup sliced or slivered almonds, toasted
1/2 avocado, diced
1/2 cup dried cranberries, cherries, or raisins
1/2 cup shredded, unsweetened coconut
handful of cilantro, chopped
2 T. balsamic vinegar (she suggests fig vinegar if you have it, but I used balsamic)
juice of 1/2 of a lime
1 T. olive oil
Directions
Rinse quinoa and cook according to package. I usually bring mine to a low boil (covered) for about 15 minutes and then let it sit covered off the heat for another 10 minutes. Place in a dish to cool in the refrigerator for a few hours.
Chop all veggies and toast almonds if necessary.
Mix balsamic, lime juice, and olive oil.
Combine cooled quinoa with all of the other ingredients and toss with dressing. Season with a little sea salt and fresh ground pepper.
What a day! Super busy morning and a dead phone battery meant no What I Ate Wednesday pics 
Luckily, there was a little time this afternoon for this…..

Seriously gorgeous Fall day! I couldn’t pass it up!

With Michigan weather, any day could be our last day out on the water, so we had to take advantage of it.

Luckily, I didn’t have to worry about dinner since it was already prepped. I threw a jar of my mom’s canned summer tomatoes into the Crockpot with a few fresh veggies and dried herbs and made my first homemade marinara sauce. Have you ever tried this? I had no idea it was so easy! And it made the house smell amazing! It was kind of an experiment so I don’t have an exact recipe yet.
I do have an awesome recipe for the meatballs that went with it though!

I actually made these on Sunday. I used the spinach feta turkey mixture to make a burger and just rolled the rest into meatballs and baked them. They are easy and come together really fast. And they are out of this world good! I served the meatballs and marinara over a bed of spaghetti squash that was roasted earlier in the day.
Spinach Feta Turkey Meatballs (or burger)
Ingredients
1 lb of lean ground turkey (see if you have the option of some local ground turkey or organic since the regular grocery store stuff contains extra flavoring additives)
Spinach (a big handful or two of fresh or you can use about 1/2 a bag of frozen spinach, defrosted, water squeezed out)
1/2 cup crumbled feta
1 egg, beaten
Salt and Pepper
Directions
If making meatballs, preheat your oven to 350 degrees. Heat a skillet to medium heat. Chop spinach finely if using fresh. Mix all ingredients together in a bowl and season with freshly ground salt and pepper. Form into patties or meatballs. To make burgers, cook patties over medium heat for about 6 minutes on each side. For meatballs, sear in the skillet to brown the meatballs and transfer to a baking sheet. Bake for 20 minutes.
Hey there!
Now that the kids are back in school, I have been hitting the books hard! When I need a study break, I either workout or get into the kitchen to try out a new recipe. I have so many awesome new recipes to share and just need to take the time to get them up here.
I debated what to call these……flourless, grain-free, gluten-free, clean-eating, paleo…… they fit into all of those categories!

My youngest, Jake, has been coming home from Kindergarten with all kinds of new lunch requests. I try to keep a low-key, balanced approach to food with my kids. After reading the book Nourishing Wisdom for my “Personal Relationship with Food” class, I have realized we should not label foods as “good” or “bad” since really, food is neutral. It is our personal judgement of a food, or how it makes us feel, that is good/positive or bad/negative. Labeling a food as “bad” sets us up for cravings, binges, and negative feelings. It is my hope that if I feed my kids enough healthy “real” food, balanced with an occasional treat here and there, that they will eventually make their own conscious decision of how certain foods make them feel and whether or not they choose to eat them.
Consequently, I feel the same way about the gluten-free craze. I may change my mind on this one over the course of my studies at NTI, but for now, I don’t think we should vilify wheat, gluten, or all grains unless there is a justified medical reason to do so. We can experiment to see how these foods make us feel and make that decision on our own. I know that wheat is a common allergen for many people and that a lot of us consume far too much of it, so I have been experimenting with a few more gluten or grain-free recipes for people that may require them.
Back to the cookies….basically the kid wants dessert every day at lunch like his friends! So what’s a kitchen-happy mom to do but get to work creating a quick, easy, cookie with healthy whole food ingredients sure to please the kid in all of us!

I have a few different variations on this recipe. The original – mmm, good. Or the it’s-Fall-time-to-make-pumpkin-everything version – mmm, super good! Maybe more of an adult flavor though.

Give these a try and let me know what you think!
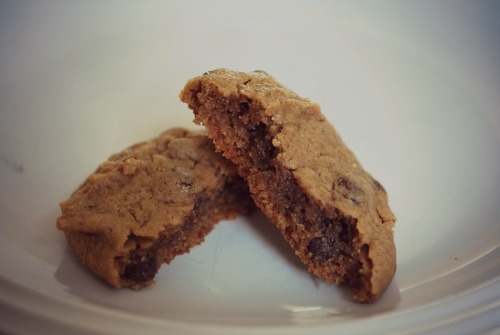
Flourless Chocolate Chip Cookies
adapted from myrecipes.com
Ingredients
1 cup natural nut butter (PB is great – more kid-friendly flavor, almond butter works too-more health benefits)
1/3 cup pure maple syrup OR honey
1 egg
1/2 tsp baking soda
1/2 tsp sea salt
scant 1/3 cup mini chocolate chips (I have been buying soy free, dairy free by Enjoy Life)
Directions
Preheat oven to 350 degrees. Mix all ingredients together. Use a spoon or small ice cream scoop and place on a pan lined with Silpat or Parchment Paper. Bake for 9-11 minutes. Cool on the pan for about 10 minutes, then transfer to a wire rack to cool completely. I like the cookies on the softer side, but need them to hold up in a lunchbox. They are still a very soft cookie so store in the refrigerator or freezer!!
Flourless Pumpkin Chocolate Chip Cookies
Ingredients
1 cup natural nut butter (same as above PB or almond butter)
1/3 cup pure maple syrup OR honey
1 egg
1/2 cup canned 100% pure pumpkin
1/2 tsp baking soda
1/2 tsp sea salt
1-1 1/2 tsp pumpkin pie spice
scant 1/3 cup mini chocolate chips (I have been buying soy free, dairy free by Enjoy Life)
Directions
Preheat oven to 350 degrees. Mix all ingredients together. Use a spoon or small ice cream scoop and place on a pan lined with Silpat or Parchment Paper. Bake for 15 minutes or to your liking. The pumpkin cookies need a little longer to bake than the original. Cool on the pan for 10 minutes, then move to a wire rack to cool completely. Store in the refrigerator or freezer as they are super soft.
NOTES
My kids definitely prefer the plain chocolate chip cookie recipe using peanut butter.
To make both types of cookies, start off making this recipe as the original chocolate chip, scoop out 12 cookies onto a pan, then add 1/4 cup pumpkin and 3/4 tsp. pumpkin pie spice to the remaining batter in the bowl. Then proceed with the next 12 cookies so that you have the best of both worlds!
They are definitely a super soft cookie compared to a store-bought cookie. They should be stored in the fridge or freezer and taste great straight from the freezer!
What is going on with this cool weather?!? Summer can come back anytime now!!!
Well, I guess its a good excuse to make some soup. This actually works quite well as a summer soup since cauliflower is in season and it comes together so quickly that you’ll hardly have your stove on for more than 10 or 15 minutes tops!

Jake has really been into cauliflower lately so I had picked up this reduced-price cauliflower at the grocery store last week. And, well, who can pass up produce for 50 cents!?! It was a double score because lemons were on clearance too!

With these two ingredients, I knew I had to make this recipe that I had seen over at Kristens Raw. As a side note, I love that she is including more high quality cooked ingredients into her recipes now! This soup is seriously so easy that it can hardly even be considered a recipe!!!!
Lemon Butter Cauliflower Soup
Inspired by and adapted from here
Ingredients
2 heads of cauliflower, cut into florets and washed
2 T grass-fed butter*
Lemon, juice and zest
Sea salt and freshly ground black pepper
*See notes below for nutritional information on grass-fed butter. I highly recommend Kerrygold grass-fed Irish butter, which is easily found at Trader Joes and other grocery stores for less than $3.
Directions
Add water to a large soup pot (or Dutch oven) until it is 2-3 inches high. Bring water to a boil.
Add cauliflower florets to boiling water (water does not need to cover all of the cauliflower). Cover with a lid and steam for about 10 minutes or so, until it is tender enough to easily be pierced by a fork.
While cauliflower is cooking, zest the lemon and set aside. Then slice lemon in half and squeeze juice into a small bowl removing any seeds.
Scoop half of the cooked cauliflower into a blender and add 1 T of the butter and 2tsp of the lemon juice. Blend until smooth, adding some of the water from the pot as necessary to thin the soup.
Add remaining cauliflower, 1 T of butter, and 2 tsp of lemon juice and blend until smooth.
The entire amount fit nicely into my standard blender, but you can blend the soup in batches if necessary.
Season soup with about 1/2 tsp of sea salt and freshly ground pepper. Top individual bowls with additional pepper and lemon zest to serve.
Of course it always helps when you enjoy your soup outside with a beautiful view like this!

Beautiful view from the deck of our cottage!
The Happy Family loves this Healthy Plate because:
Antioxidants – cauliflower contains a ton of vitamin C and manganese, as well as carotenoids. These little florets pack a punch in fighting free-radicals!
Vitamin K and Omega-3 Fatty Acids – both of these help to reduce inflammation in the body. Cauliflower contains omega-3 fatty acids, the same healthy fats found in salmon and flax seeds, but with the added bonus of practically no calories!
Fiber – Each serving of cauliflower contains 3 grams of fiber, helping to cleanse the digestive tract.
Loads of B Vitamins – Cauliflower contains an array of B vitamins: 1, 2, 3, 5, 6, and 9 to be exact. That includes folic acid, so if you are pregnant or planning to become pregnant, be sure to add this vegetable to your weekly consumption.
Grass-fed butter – this deeply colored, vitamin-rich version of butter is a source of healthy saturated fats and is naturally high in Conjugated Linolenic Acids (CLA), which has been linked to heart health and better body fat composition. Grass-fed butter is also high in Vitamin K2 which appears to reduce, prevent, or even counteract arterial plaque, and it helps the body use calcium correctly and effectively.
Lemon zest – Lemon peels consists of components known as salvestrol Q40 and limonene, which are known to fight against cancerous cells in the body. Also, the flavonoids present in the peel are effective in curbing the division of cancerous cells.
We have been making this Avocado Chicken Salad a lot this summer. I have even served it while entertaining, and everyone seems to really like it!
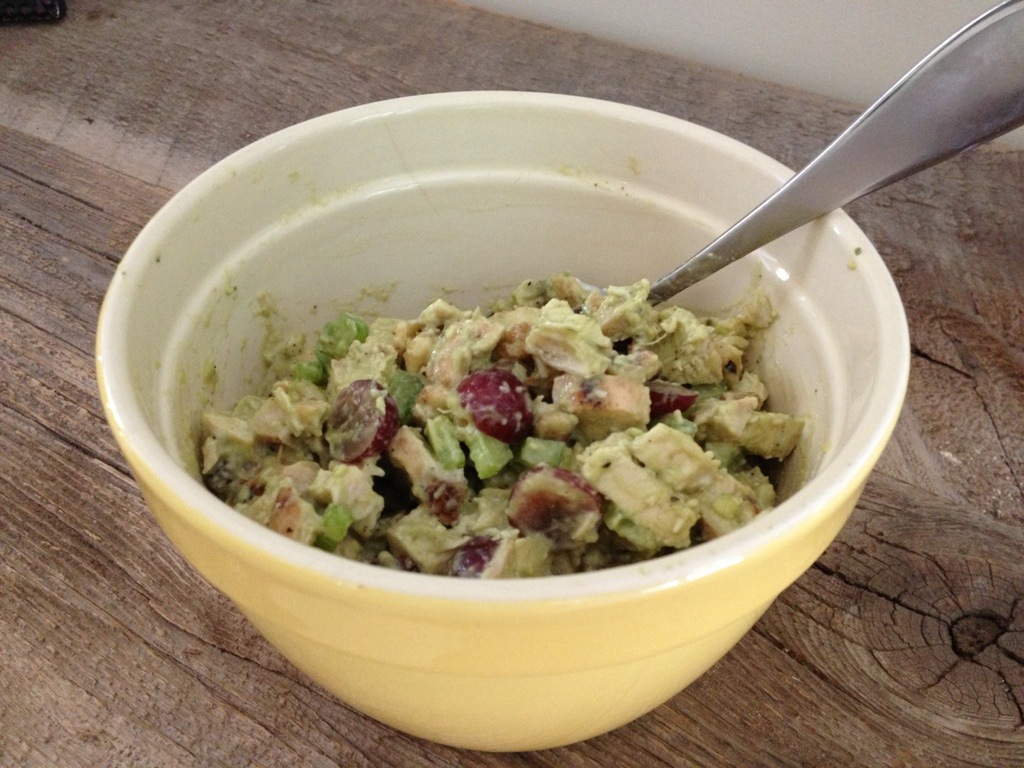
Clean Eating Chicken Salad made with avocado and Greek yogurt instead of mayo!
This is hardly a recipe – use what you have on hand and tweak it to your liking!! Mine tastes a little different every time! It’s also a great way to use up any leftover grilled, roasted, or rotisserie chicken.
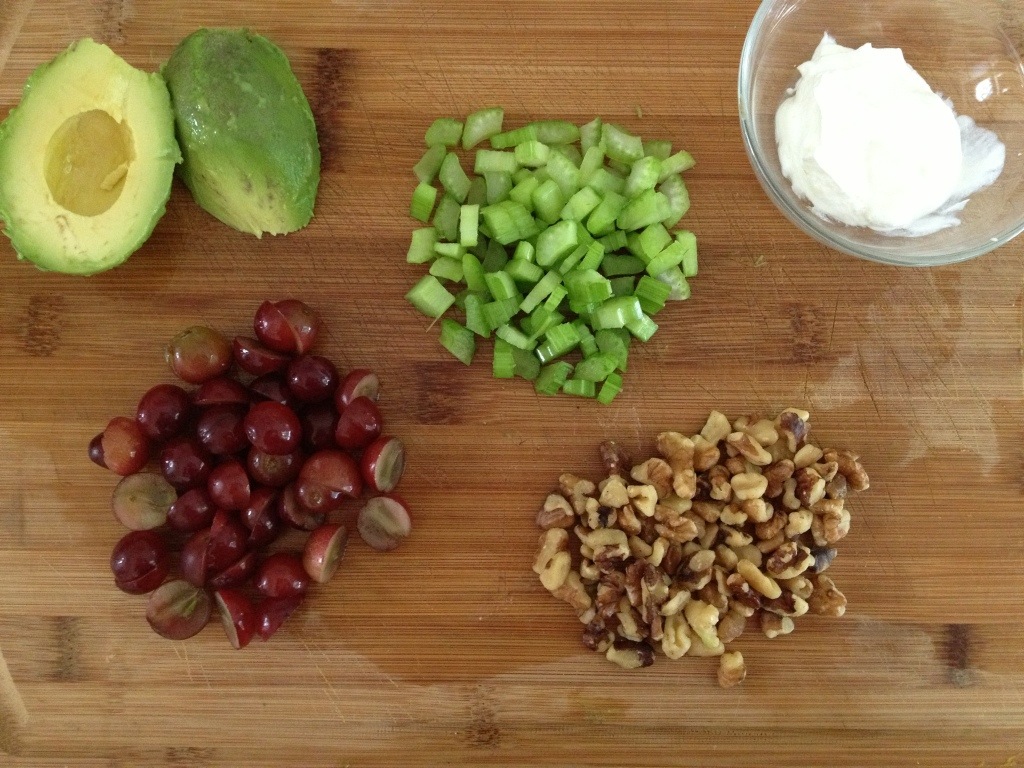
avocado, Greek yogurt, red grapes, diced celery, and chopped walnuts
Clean-Eating Avocado Chicken Salad Wraps
Ingredients
About 2 chicken breasts, grilled, cooled, and chopped or shredded
1 small or 1/2 large avocado
1-2 T plain Greek yogurt
Salt, pepper, and dried tarragon (optional)
1/2 cup chopped red grapes
1/4 cup chopped walnuts
1/4 cup celery, diced small
1/4 cup red onion, diced small
Ezekiel sprouted grain, lettuce leaves, or whole wheat pita for serving
Directions
If you don’t have leftover chicken to start with, you’ll need to season 2 small chicken breasts with salt, pepper and garlic powder and bake or grill until done. Cool and chop or shred the chicken.
In a medium bowl, mash up 1 small or 1/2 of a large avocado. Add in 1-2 Tablespoons of plain Greek yogurt and mix well. Season with sea salt, fresh ground pepper and a sprinkle of dried tarragon if you have it.
Add in chopped grapes, celery, walnuts, and red onion.
Mix in chopped chicken and combine all ingredients. Taste and adjust ingredients as necessary.
Serve in lettuce wraps, in whole wheat pita pockets, or open face on toasted Ezekiel sprouted grain bread. Enjoy with a side of fresh fruit for a great summer lunch!!!!!

Summer Lunch! Avocado Chicken Salad served in lettuce wraps.
The Happy Family loves this Healthy Plate because:
avocado – full of heart-healthy fats that are anti-inflammatory and help the body to absorb fat-soluble nutrients. Avocados are high in potassium which helps reduce blood pressure, folate for healthy fetal development, and lutein for eye health.
red grapes – contain flavanoids which can help slow the build up of plaque build up in the arteries leading to heart disease. Red grapes are also full of antioxidants that prevent damage to your body from harmful free radicals. The skins of red grapes contain resveratrol, which helps to lower your blood cholesterol level.
walnuts – packed with Omega-3 fatty acids which are beneficial for reducing depression, ADHD, cancer and Alzheimers, and can also counter inflammatory diseases such as rheumatoid arthritis and Crohns disease. Walnuts also contain antioxidants for heart health and reducing the risk of certain cancers.
I can’t believe summer is half over!! We have been busy doing all of the kids’ favorite summer things – bike rides, going to the beach, letterboxing, playing with cousins, picking blueberries, trips to the cottage, paddleboarding, sleepovers, and going to fun day camps. So much more still to pack into these next few weeks!!
I started off this morning with one of the most awesome smoothies I have made in a long time.
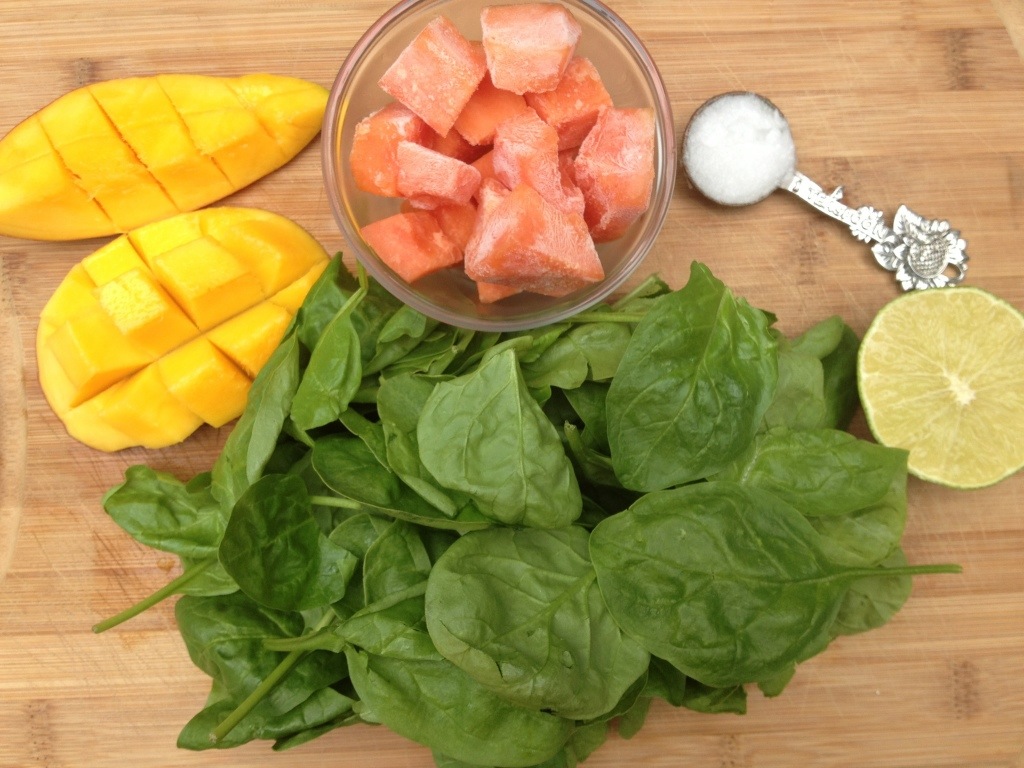
About 2 cups of spinach, 1/2 cup frozen papaya chunks, 1/2 of a mango, 1 teaspoon of coconut oil, and a squeeze of lime. YUM! If you are attempting your first green smoothie, try this one for sure!!
Be sure to blend the greens with about a cup of water first to get them fully blended. Then, add in the fresh and frozen fruit and blend again, adding enough water to get to your desired consistency.
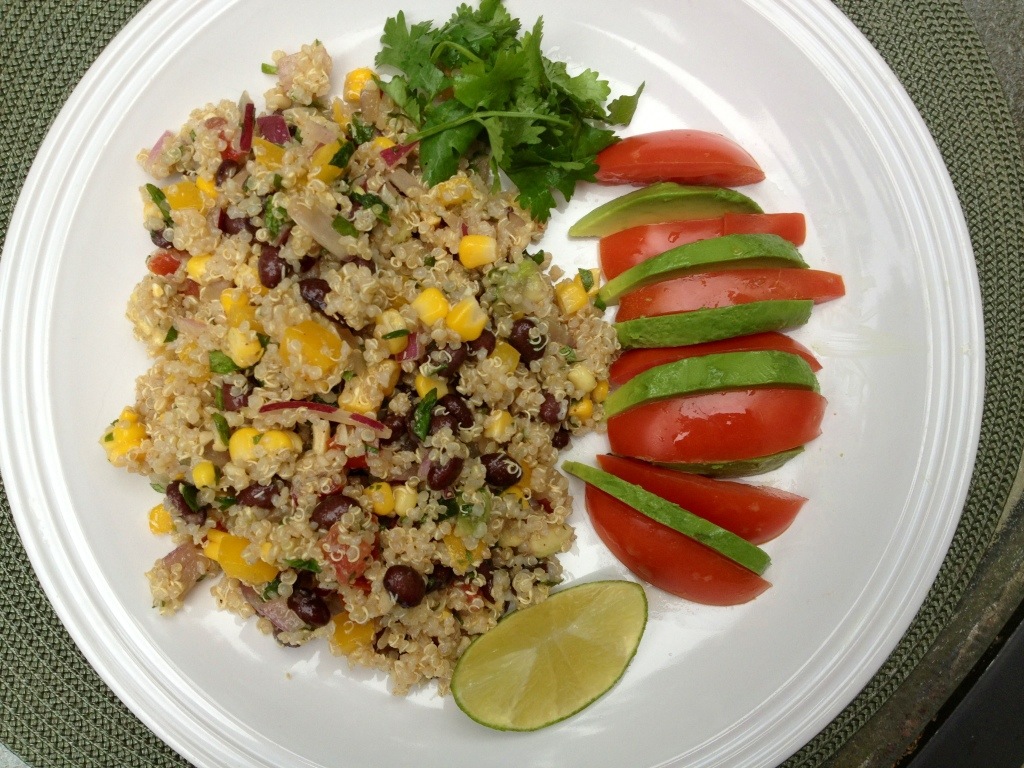
For lunch, I had some leftover southwestern quinoa salad that I took to a family get together over the weekend. It was just a little variation from the recipe I’ve posted on here before. It was cooked and cooled quinoa mixed with black beans, fresh corn from the cob, red onion, yellow pepper, tomato, avocado, and fresh cilantro tossed in a simple vinaigrette of fresh squeezed lime juice, olive oil, sea salt, ground cumin and chili powder. I also had a little extra tomato and avocado on the side.
After lunch, the kids and I biked a couple miles down to one of our favorite parks.

We hiked up the 104 steps to see this view. The waves in Lake Michigan were crazy today!


We were all starving when we got back two hours later so we snacked on the Blueberry Lemon Oatmeal Squares from yesterday. We may have each had two of them! Hiking and biking makes us hungry!!!

For dinner, Jake requested the Lasagna Roll Ups that he made in his Gourmet Cooking Camp a couple weeks ago. They were so quick and easy and the kids gobbled them up! New family favorite here!!!!

Lasagna Roll Ups
Ingredients
9 whole wheat lasagna noodles
1 lb organic, grass fed ground sirloin (optional)
1 box frozen chopped spinach, defrosted and excess water squeezed out
1 container part skim ricotta cheese
1 jar pasta sauce (we like the Newmans Own fire roasted tomato)
1-2 cups shredded mozzarella
Seasonings such as garlic powder, dried basil, oregano, and sea salt
Shredded Parmesan
Directions
Preheat oven to 350 degrees.
Cook noodles in boiling water according to package directions.
Cook ground beef and drain off any excess fat.
Mix together ricotta, drained spinach, cooked ground beef (if using), and season with a little sea salt and Italian seasonings.
Spoon half of the sauce into the bottom of 18 muffin tin wells.
Lay out cooked noodles on a large cutting board and blot dry.
Spread mixture onto noodles. Sprinkle with a little mozzarella.
Roll noodles up and slice in half. Place halves into muffin tin.
Top with more sauce and shredded mozzarella. Sprinkle with some shredded Parmesan cheese and bake for 25 minutes.
We served this with a green salad loaded with veggies topped with a simple homemade vinaigrette and the kids ate every last bite!!

Happy Wednesday!
This is typically the day that I post a snapshot of everything I eat for the entire day. Today was a little bit unusual since I am starting to get that dreaded might-be-getting-sick feeling. I know I say it repeatedly on here, but I truly believe that food can be a powerful tool for healing the body. Because of that, I am planning to focus on really nutrient-dense foods including fresh juice, smoothies, and soup, plus a little extra sleep over the next couple of days to hopefully be able to fight this off before it totally knocks me out.
For breakfast, I brought out the Big Guns – the juicer! The difference between juicing and blending smoothies is that juicing provides a supershot of vitamins and minerals straight to your cells without having to break down any of the fiber in the fruits or veggies through digestion. This can be very high in sugars, though, which is why I try to balance it with a good amount of vegetables too.
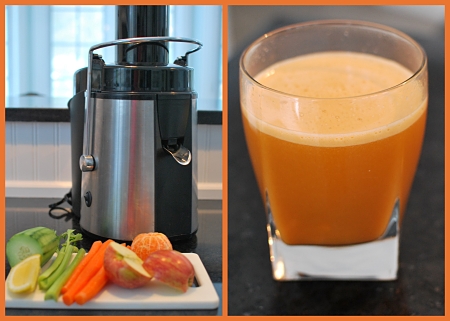
This juice had 3 carrots, 3 stalks of celery, 1/3 of a cucumber, 1 small clementine, and 1 apple. After I put it all through the juicer, I added a squeeze of fresh lemon. Maybe it was a placebo effect, but I swear I already started feeling better after drinking it
I really didn’t have much of an appetite all morning but knew I need something else. A smoothie seemed like a good idea.
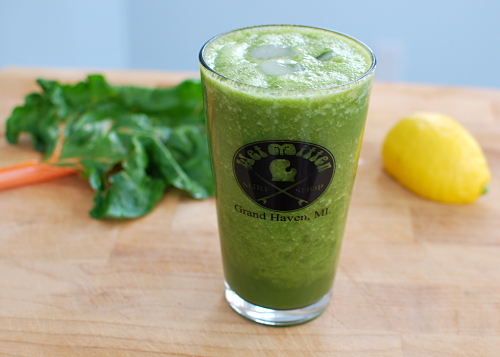
Is it just me or is Rainbow Chard one of the prettiest vegetables around?!?
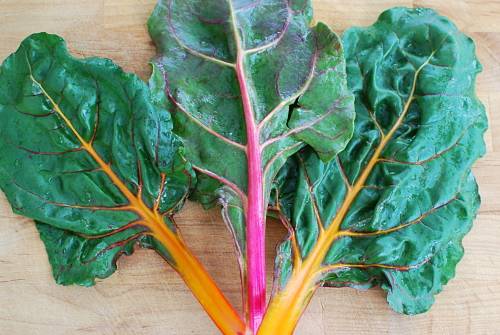
I added these three leafy beauties, 1/3 of a cucumber, 1/2 banana, 1 red pear, 1 lemon wedge, and 1/4 tsp of ground ginger to the blender with lots of water. I have been inspired to try new juice/smoothie combinations lately and this one was spot on! So good!!!
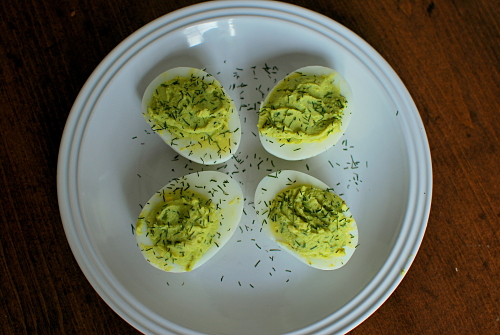
I finally started to feel a little hungry this afternoon, but a salad or sandwich didn’t really sound good. This is a snack that I learned from surfing the Paleo and Clean Eating sites. It’s like a cleaned up version of deviled eggs with avocado instead of the mayo. I actually prefer them this way now!
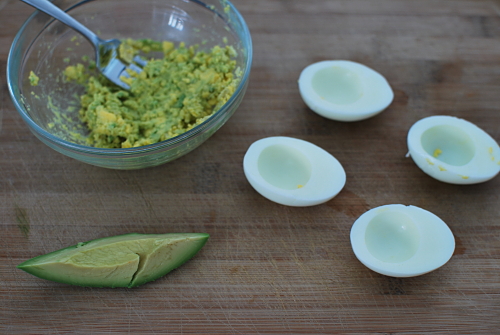
I mix two hard-boiled egg yolks with a wedge of avocado (about 1/8 of the whole avocado), some salt, pepper, and dried dill. Pack a spoonful of the mixture back into the egg-white halves and you have yourself a great little snack or light lunch that is packed with protein and healthy fats, and surprisingly filling.
Luckily I had soup planned for dinner tonight. You just can’t beat soup when you’re sick!
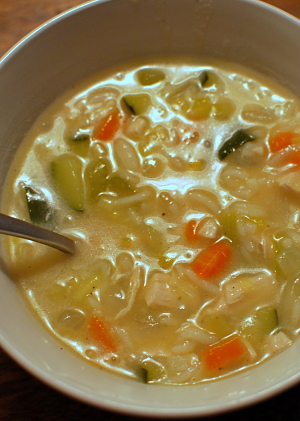
Chicken Rice Soup
Ingredients
1 cup of cooked rice
2 chicken breasts, cooked, cut into bite-size pieces
3 carrots, diced
2 ribs of celery, diced
1 onion, diced
1 leek, white and light green part, sliced into half-moon shapes
1 small zucchini, quartered lengthwise and chopped into small pieces
3 cloves of garlic, minced
1 T. extra virgin olive oil
1 T. flour (I used Bob’s Red Mill Gluten-Free, but wheat would work too)
4 cups organic chicken broth
salt and pepper to taste
3 T. mellow white miso (optional, but adds a lot of flavor and nutrients)
Directions
I cooked the rice and chicken breast ahead of time so the soup would come together quickly. Heat 1 T. olive oil in a large stock pot over medium heat. Saute chopped carrots, celery, onion, leek, and zucchini until tender, about 7-10 minutes. Add the minced garlic towards the end so that it doesn’t burn. Sprinkle 1 T. of flour over vegetable mixture. If using the miso paste, pour 1/2 cup of broth into a small bowl and whisk in miso. Add remaining broth, cooked rice, chopped chicken and season with salt and pepper as necessary. Bring to a low boil and simmer for 10 minutes. Add miso/broth mixture at the very end to avoid over-heating and destroying the nutrients in the miso.
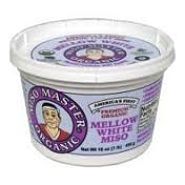
A note on the miso. This is something that I like to have on hand for soups, especially when we are not feeling well. Miso is made from fermented soybeans and is usually a thick paste texture with a very salty taste. You usually find it in the refrigerated section of a health food store. I always try to buy quality organic miso paste so that I know it is non-gmo since a lot of soy products are genetically modified. The benefit of using miso is that it is a probiotic, full of good bacteria, which promotes healthy intestines and strengthens the immune system. It is crucial not to overheat the miso when cooking so that you don’t destroy the healthy bacteria. Miso is also a great source of the mineral zinc, which can be helpful for increasing the immune system and fighting off cold viruses.
To go with the soup, I made grilled cheese sandwiches for the kids and big salads for the adults. When we lived in Chicago, there was a restaurant (a sports bar really!) that had The. Best. Balsamic. Dressing. EVER! This was my attempt at recreating it based off of a few different recipes.

Balsamic Vinaigrette
Ingredients
1/3 cup balsamic vinegar
1 small clove of garlic, minced
pinch of salt and fresh ground pepper
1 tsp. honey
1/3 cup plus half of 1/3 cup extra virgin olive oil
Directions
Add balsamic vinegar, chopped garlic, honey, salt and pepper to a blender. Blend on medium-high until garlic is pureed into the vinegar. With the blender on low-medium, remove the center cap in the lid and slowly drizzle in the olive oil. This will emulsify the dressing giving you a “creamy” balsamic texture.
I am always looking for healthy snack ideas for my kids. On days that they have school, I have to pack them two snacks in addition to their lunch. Even on days when they are home, it seems like they are always asking for snacks.
This recipe is super easy to whip up and it is full of healthy, whole food ingredients. And in this house, it also doubles as dessert – especially on those nights when the kids aren’t particularly fond of my dinner and I feel like they could use a little more substance so that they don’t go to bed hungry.
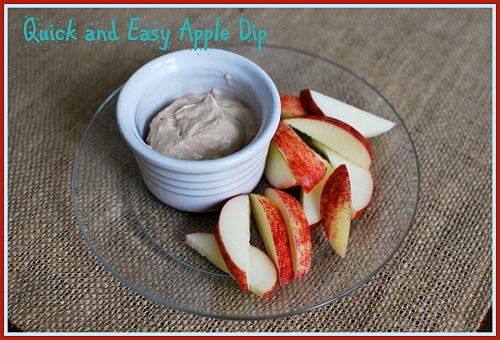
Quick & Easy Apple Dip
Recipe adapted from happy healthy mama
- 1/2 cup plain Greek yogurt
- 3 T. all natural peanut butter or almond butter (no sugar added)
- 1-2 T. honey or maple syrup
- 1/4 tsp cinnamon
Mix all ingredients in a bowl and serve with cut fruit, such as apples or bananas, and or organic, whole grain graham crackers. For a nut-free option when I pack this for a school snack, I substitute sunflower seed butter and it is just as good!
I have to admit, I’m actually a little excited that it is Monday. I like the thrill of tackling my to-do list, getting organized, and being productive. In terms of the blog, it means I can post a meatless meal without having to explain myself. I have to say, I am so much more comfortable posting undeniably nutritious vegetarian and vegan recipes because it is something that I feel so strongly about.
Every once in awhile, I come across some new information from a book, online research, or a documentary, and it just reignites the flame for me. This weekend we watched the documentary “Food Matters.” While it is not the most captivating and well-delivered documentary I’ve seen, it is very powerful information that everyone needs to know.
This movie begins with one of my favorite quotes, “Let food be thy medicine and medicine be thy food,” from Hippocrates, the “father of medicine.” Unfortunately our society has turned its back on this very fundamental and powerful concept that food is medicine. Most medical doctors today have very little, if any, training in nutrition. Instead of looking to the powerful healing properties of the foods included a patient’s diet, doctors are more focused on prescribing “a pill for every ill” which oftentimes ends up doing more harm than good. Every year 225,000 people die from improperly used medications. Another 2.2 million end up in the hospital from adverse reactions to prescribed medications. With over $289 billion in annual sales in the U.S., it makes sense that doctors are over-prescribing these medications because prescription drugs are big business for pharmaceutical companies.
In 2009, the U.S. spent $2.5 trillion dollars on healthcare, the highest of any country. At this amount, I would expect to have access to some of the best medicine in the world. But we don’t. We spend more than every other country with only mediocre outcomes. Each year approximately 575,000 people in the U.S. are still dying from cancer and almost 600,000 will die from heart disease.
Fortunately, most chronic disease such as heart disease, cancer and diabetes can be prevented through simple lifestyle choices including daily exercise, not smoking, eating a proper diet of whole foods (including organic fruits and vegetables and an appropriate calorie level), reducing stress, reducing exposure to environmental toxins (such as BPA), and limiting alcohol consumption.
Furthermore, there are a number of other health conditions, such as depression, high blood pressure, and digestive issues to name a few, that can be effectively treated through proper nutrition and/or vitamin supplements.
Yes, you most definitely have the power to prevent and reverse disease starting with a key decision you make three times a day. You can choose to fuel every single cell in your body with delicious and nutritious whole foods or you can sabotage your health with processed junk and fast food. Just like the title of the movie implies, food matters.
If you commit to making these critical food choices, I promise to deliver as many delicious recipes that I can! Starting with this Falafel and Tzatziki dip.
These falafel are great because they can be made ahead, frozen, re-heated, used multiple ways, and are kid-friendly vehicles for a yummy dipping sauce.
Start with garbanzo beans, chopped onion, 2 cloves of garlic, chopped cilantro, lemon juice, and kosher or sea salt in the bowl of a food processor.
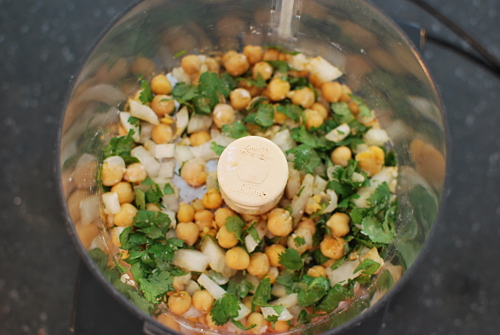
Pulse briefly.

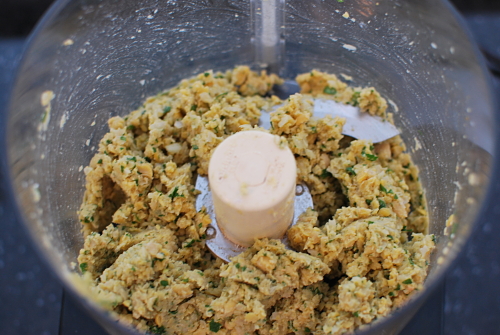
Add in ground oat flour and baking powder and pulse a few more times to combine. It is important not to over-process. You want it processed enough to stick together, but still have a little texture.
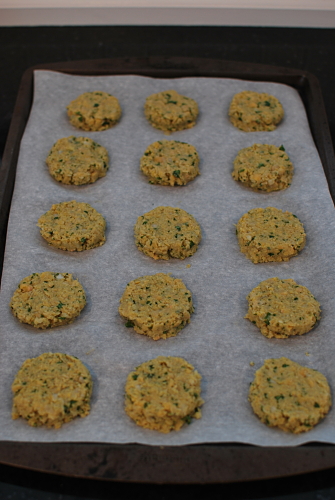
Shape this into flattened patties and refrigerate for up to 24 hours.
When you’re ready to complete the falafel, preheat oven to 350 degrees. Heat a pan coated with extra virgin olive oil over medium heat. Sear each side of the falafel patties for about a minute, or until golden brown.
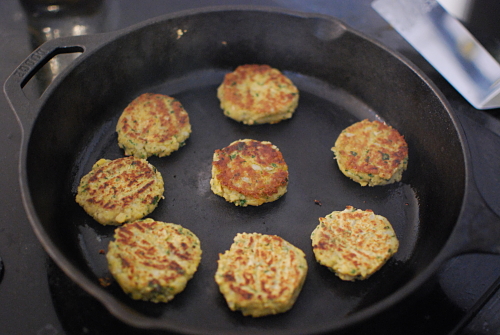
Place the patties back on the baking sheet and bake for 15-20 minutes.
Serve them alongside this Tzatziki Sauce, which you will want to make ahead of time to allow the flavors to combine.
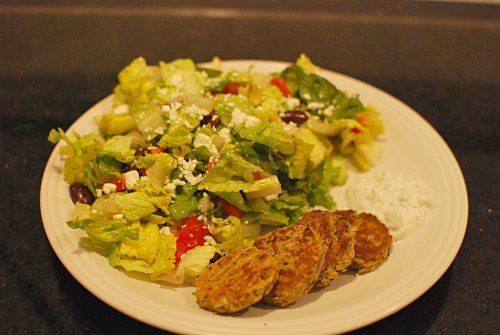
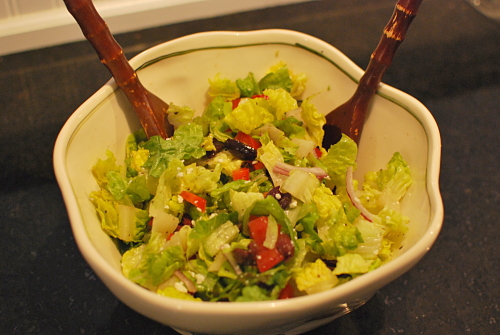
To complete the meal, I like to serve the falafel and tzatziki alongside a huge Greek salad. Everyone else likes to tuck them into a lightly toasted pita with some lettuce, tomato, cucumbers, and red onion.
Falafel with Tzatziki Dipping Sauce
Falafel Ingredients
1 can garbanzo beans, drained and rinsed
1/2 cup chopped onion
2 cloves garlic, minced
3 T. chopped cilantro
1/2 tsp kosher or sea salt
2 tsp fresh lemon juice
1 tsp ground cumin
1/2 tsp baking powder
3 T. oat flour (finely ground oats or sub wheat flour)
Extra Virgin Olive Oil to coat pan
Falafel Directions
Place drained beans, chopped onion, minced garlic, chopped cilantro, lemon juice, salt, and ground cumin into the bowl of a food processor fitted with the “S” blade. Pulse briefly to combine (see picture above). Add baking powder and flour and pulse briefly to combine, being careful not to over process. The mixture should stick together, but still have some texture (see picture above).
Scoop spoonfuls of the mixture and form into ball or flatten into discs. Cover and refrigerate for up to 24 hours.
When ready to cook falafel, preheat oven to 350 degrees. Lightly coat a skillet with extra virgin olive oil and heat over medium heat. Add falafel and sear on each side for 1-2 minutes until golden brown. Place falafel onto a baking sheet and bake in preheated oven for 15-20 minutes.
Note: Depending on your goal, the more oil you add to the pan when searing, the more traditional crunchy exterior you will get. If you prefer a lighter, healthier falafel, minimize the amount of oil that is used.
Tzatziki Sauce Ingredients
1/2 cup plain Greek yogurt
1 small clove of garlic, finely minced
1 T. fresh lemon juice
1/2 tsp dried dill
1/2 cucumber, seed area removed, chopped
Salt and Pepper to taste
Tzatziki Sauce Directions
To avoid a watery sauce, you will want to remove excess moisture from cucumbers by placing chopped cucumbers in a colander and sprinkling with 1/4 tsp salt. Let sit for approximately 15-30 minutes and squeeze dry with a paper towel. Add remaining ingredients to a mini food processor and blend for a smooth sauce. Or simply combine ingredients in a bowl for a more authentic chunky style sauce. Cover and refrigerate for at least 2 hours but up to 24 hours before serving for flavors to develop. Season with additional salt and pepper if desired. I find that because of the salt added to drain moisture from the cucumbers, additional salt isn’t usually necessary.
Note: This will provide enough sauce for one meal for 4 people. Double the recipe for additional sauce.
For a vegan Tzatziki Sauce recipe, check out this one at Peas and Thank You.
Greek Salad Dressing
Recipes from Allrecipes
Makes enough for 10-12 individual salads
1/2 cup extra virgin olive oil
1 1/4 tsp garlic powder
1 1/4 tsp dried oregano
1 1/4 tsp dried basil
1 tsp kosher salt
1 tsp onion powder
1 tsp Dijon-style mustard
2/3 cup red wine vinegar (if you don’t like a real tangy dressing, you can mix equal parts of vinegar and oil using 1/2 cup of each)
Freshly ground black pepper to taste
Add all ingredients to a glass jar (I use a mason jar) and shake well. For an authentic style Greek salad, toss a few tablespoons of dressing with romaine, cucumbers, bell peppers, tomato, red onion, kalamata olives, and Feta cheese.
Note: After consulting with a professionally trained chef, I have learned that technically this dressing does not need to be refrigerated. To be cautious, though, we refrigerate ours. Doing so will cause the oil to solidify. I take it out of the refrigerator and set it on the counter when I begin making dinner to give the olive oil time to dissolve and then shake it well before serving.