Welcome!
 Hi, I'm Tori! Welcome to Healthy Plate Happy Family!
I am a fun-loving, healthy-eating, wife, mom, holistic
nutrition student, aspiring yogi, SUP-enthusiast, living
and loving life on the beautiful coast of West Michigan.
Here you'll find all of the whole foods, clean-eating recipes
that I am cooking up to keep my family happy and healthy!
Thanks for stopping by!
Hi, I'm Tori! Welcome to Healthy Plate Happy Family!
I am a fun-loving, healthy-eating, wife, mom, holistic
nutrition student, aspiring yogi, SUP-enthusiast, living
and loving life on the beautiful coast of West Michigan.
Here you'll find all of the whole foods, clean-eating recipes
that I am cooking up to keep my family happy and healthy!
Thanks for stopping by!


Another full day re-cap of my meals for the day. I’m going to try to keep it brief because we are busy around here packing up and getting ready to head north for a weekend of skiing!
For breakfast, I have been trying to shake it up a little with my green smoothie ingredients. I have read that its a good idea to switch up your greens every once in awhile to vary your exposure to the naturally occurring toxins as well as the beneficial alkaloids. Diversity is always a good thing!
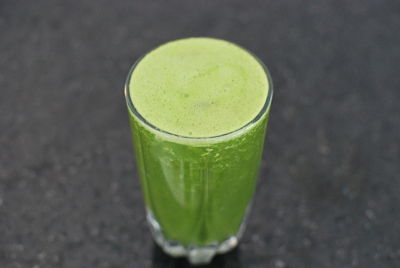
I am loving this combination:
- 2-3 Rainbow Chard leaves
- 1 stalk of celery
- 1/3 of a cucumber
- 1/3 cup of diced fresh pineapple
- 1/2 of a banana
- Enough water to get to your preferred consistency
Right after that, came my new breakfast obsession!!!!
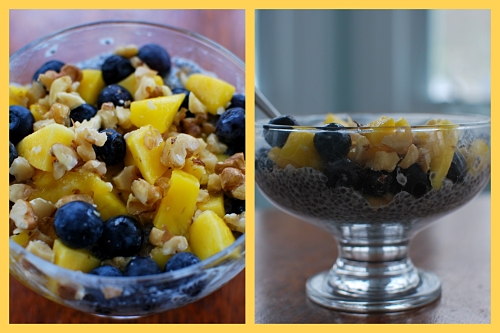
Overnight Chia Pudding
- 1/2 cup lite coconut milk
- 2 T. chia seeds
Mix well and let soak overnight in a sealed container. In the morning, add toppings of your choice. This has diced mango, fresh blueberries, and chopped walnuts.
If you’ve gone out on a limb and bought some chia seeds to experiment, I strongly encourage you to give this recipe a try. When mixed with liquid, the seeds will absorb the liquid forming a gel-like consistency, which some describe as being similar to tapioca pudding. They have almost no flavor so they take on the flavor of whatever liquid they absorb.
Benefits of the Amazing Chia Seed
- loaded with soluble and insoluble fiber – helps keep you full
- the richest plant source of Omega 3’s – reduces inflammation to reduce chronic disease
- a rich source of complete plant based protein
- help stabilize blood sugar
- extremely high in antioxidants – help fight the damage causing free radicals
Chia seeds are so packed with nutrients, its no wonder that they are considered a SUPERFOOD!
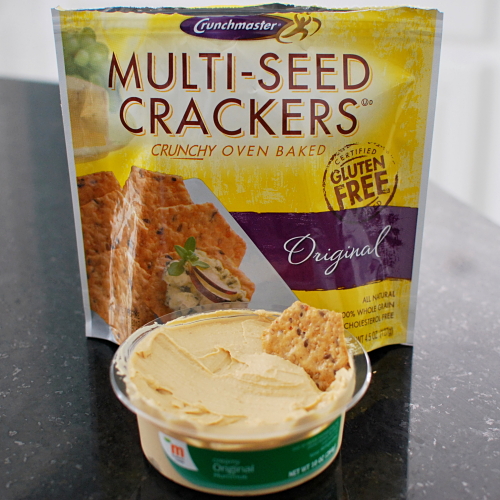
While getting ready for lunch, I snacked on some gluten-free crackers and hummus.
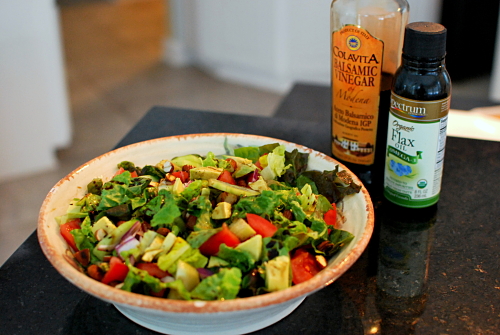
Lunch was a salad with romaine, tomatoes, cucumbers, red onion, lightly toasted almonds, diced avocado. It was topped with a simple dressing of 1/2 balsamic vinegar and 1/2 flax oil and some fresh ground salt and pepper. I like to mix this really well to incorporate the avocado. This salad combo tastes great with mixed greens too!
Afternoon snack was 2 of the Mini Banana Chocolate Chip muffins that are a regular feature in this house now!!
Dinner was so easy and so good – I just wish the kids liked this a little more. Its not that its overly spicy. They did like the veggies. It may just take a few more exposures to this dish. And chopsticks always help make a dish more fun!

Coconut Curry Chicken with Red Pepper and Snap Peas
Ingredients
1 cup light coconut milk
1 T. red curry paste
2 tsp. fish sauce (don’t be scared by this!! You’ll find it in the Asian section of the supermarket)
1 T. brown sugar
1-2 chicken breasts, cut into thin bite size pieces
1 red pepper, chopped into medium-size pieces
1 1/2 cups snap peas
2 cloves garlic, finely minced
coconut oil for stir frying
Directions
Heat skillet to medium and add about 1 tsp of coconut oil (or other high heat oil such as grapeseed). Stir fry chicken for a few minutes until no longer pink. Remove from pan and set aside. Add a little more oil to the pan and stir fry red pepper and snap peas for a few minutes until tender crisp. Meanwhile, whisk together coconut milk, red curry paste, brown sugar, and fish sauce. Add minced garlic to pan and saute for 1 minute (garlic burns very easily). Then, add chicken back to pan and pour sauce in. Combine and let simmer for a few minutes. Serve over rice.
Enjoy the rest of your week! Thanks to technology, I have a few new recipes scheduled to post in the next couple of days while we’re out on the slopes 
I have to admit, I’m actually a little excited that it is Monday. I like the thrill of tackling my to-do list, getting organized, and being productive. In terms of the blog, it means I can post a meatless meal without having to explain myself. I have to say, I am so much more comfortable posting undeniably nutritious vegetarian and vegan recipes because it is something that I feel so strongly about.
Every once in awhile, I come across some new information from a book, online research, or a documentary, and it just reignites the flame for me. This weekend we watched the documentary “Food Matters.” While it is not the most captivating and well-delivered documentary I’ve seen, it is very powerful information that everyone needs to know.
This movie begins with one of my favorite quotes, “Let food be thy medicine and medicine be thy food,” from Hippocrates, the “father of medicine.” Unfortunately our society has turned its back on this very fundamental and powerful concept that food is medicine. Most medical doctors today have very little, if any, training in nutrition. Instead of looking to the powerful healing properties of the foods included a patient’s diet, doctors are more focused on prescribing “a pill for every ill” which oftentimes ends up doing more harm than good. Every year 225,000 people die from improperly used medications. Another 2.2 million end up in the hospital from adverse reactions to prescribed medications. With over $289 billion in annual sales in the U.S., it makes sense that doctors are over-prescribing these medications because prescription drugs are big business for pharmaceutical companies.
In 2009, the U.S. spent $2.5 trillion dollars on healthcare, the highest of any country. At this amount, I would expect to have access to some of the best medicine in the world. But we don’t. We spend more than every other country with only mediocre outcomes. Each year approximately 575,000 people in the U.S. are still dying from cancer and almost 600,000 will die from heart disease.
Fortunately, most chronic disease such as heart disease, cancer and diabetes can be prevented through simple lifestyle choices including daily exercise, not smoking, eating a proper diet of whole foods (including organic fruits and vegetables and an appropriate calorie level), reducing stress, reducing exposure to environmental toxins (such as BPA), and limiting alcohol consumption.
Furthermore, there are a number of other health conditions, such as depression, high blood pressure, and digestive issues to name a few, that can be effectively treated through proper nutrition and/or vitamin supplements.
Yes, you most definitely have the power to prevent and reverse disease starting with a key decision you make three times a day. You can choose to fuel every single cell in your body with delicious and nutritious whole foods or you can sabotage your health with processed junk and fast food. Just like the title of the movie implies, food matters.
If you commit to making these critical food choices, I promise to deliver as many delicious recipes that I can! Starting with this Falafel and Tzatziki dip.
These falafel are great because they can be made ahead, frozen, re-heated, used multiple ways, and are kid-friendly vehicles for a yummy dipping sauce.
Start with garbanzo beans, chopped onion, 2 cloves of garlic, chopped cilantro, lemon juice, and kosher or sea salt in the bowl of a food processor.
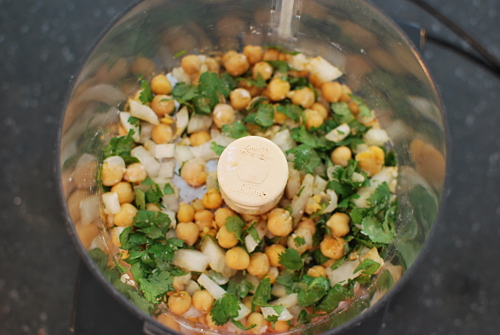
Pulse briefly.

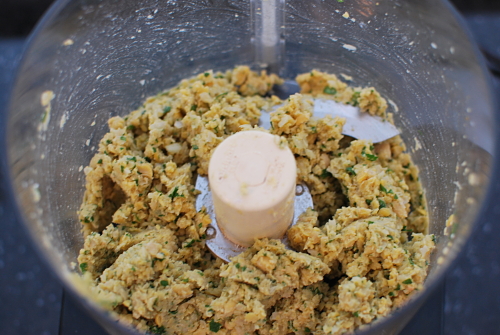
Add in ground oat flour and baking powder and pulse a few more times to combine. It is important not to over-process. You want it processed enough to stick together, but still have a little texture.
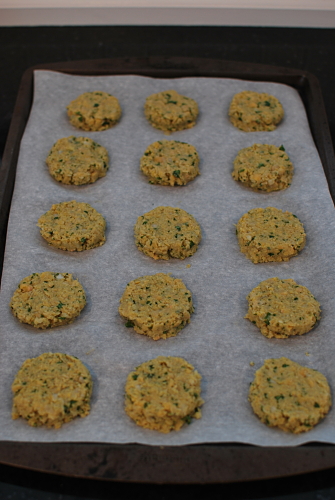
Shape this into flattened patties and refrigerate for up to 24 hours.
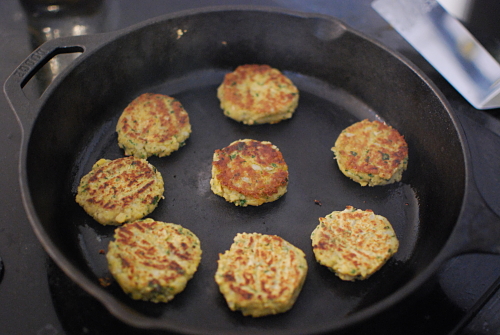
When you’re ready to complete the falafel, preheat oven to 350 degrees. Heat a pan coated with extra virgin olive oil over medium heat. Sear each side of the falafel patties for about a minute, or until golden brown.
Place the patties back on the baking sheet and bake for 15-20 minutes.
Serve them alongside this Tzatziki Sauce, which you will want to make ahead of time to allow the flavors to combine.
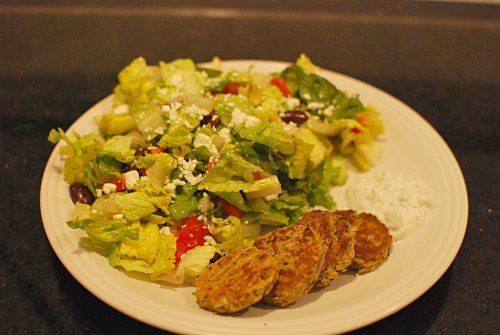
To complete the meal, I like to serve the falafel and tzatziki alongside a huge Greek salad. Everyone else likes to tuck them into a lightly toasted pita with some lettuce, tomato, cucumbers, and red onion.
Falafel with Tzatziki Dipping Sauce
Falafel Ingredients
1 can garbanzo beans, drained and rinsed
1/2 cup chopped onion
2 cloves garlic, minced
3 T. chopped cilantro
1/2 tsp kosher or sea salt
2 tsp fresh lemon juice
1 tsp ground cumin
1/2 tsp baking powder
3 T. oat flour (finely ground oats or sub wheat flour)
Extra Virgin Olive Oil to coat pan
Falafel Directions
Place drained beans, chopped onion, minced garlic, chopped cilantro, lemon juice, salt, and ground cumin into the bowl of a food processor fitted with the “S” blade. Pulse briefly to combine (see picture above). Add baking powder and flour and pulse briefly to combine, being careful not to over process. The mixture should stick together, but still have some texture (see picture above).
Scoop spoonfuls of the mixture and form into ball or flatten into discs. Cover and refrigerate for up to 24 hours.
When ready to cook falafel, preheat oven to 350 degrees. Lightly coat a skillet with extra virgin olive oil and heat over medium heat. Add falafel and sear on each side for 1-2 minutes until golden brown. Place falafel onto a baking sheet and bake in preheated oven for 15-20 minutes.
Note: Depending on your goal, the more oil you add to the pan when searing, the more traditional crunchy exterior you will get. If you prefer a lighter, healthier falafel, minimize the amount of oil that is used.
Tzatziki Sauce Ingredients
1/2 cup plain Greek yogurt
1 small clove of garlic, finely minced
1 T. fresh lemon juice
1/2 tsp dried dill
1/2 cucumber, seed area removed, chopped
Salt and Pepper to taste
Tzatziki Sauce Directions
To avoid a watery sauce, you will want to remove excess moisture from cucumbers by placing chopped cucumbers in a colander and sprinkling with 1/4 tsp salt. Let sit for approximately 15-30 minutes and squeeze dry with a paper towel. Add remaining ingredients to a mini food processor and blend for a smooth sauce. Or simply combine ingredients in a bowl for a more authentic chunky style sauce. Cover and refrigerate for at least 2 hours but up to 24 hours before serving for flavors to develop. Season with additional salt and pepper if desired. I find that because of the salt added to drain moisture from the cucumbers, additional salt isn’t usually necessary.
Note: This will provide enough sauce for one meal for 4 people. Double the recipe for additional sauce.
For a vegan Tzatziki Sauce recipe, check out this one at Peas and Thank You.
Greek Salad Dressing
Recipes from Allrecipes
Makes enough for 10-12 individual salads
1/2 cup extra virgin olive oil
1 1/4 tsp garlic powder
1 1/4 tsp dried oregano
1 1/4 tsp dried basil
1 tsp kosher salt
1 tsp onion powder
1 tsp Dijon-style mustard
2/3 cup red wine vinegar (if you don’t like a real tangy dressing, you can mix equal parts of vinegar and oil using 1/2 cup of each)
Freshly ground black pepper to taste
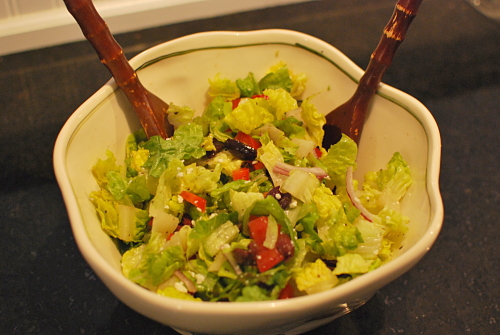
Add all ingredients to a glass jar (I use a mason jar) and shake well. For an authentic style Greek salad, toss a few tablespoons of dressing with romaine, cucumbers, bell peppers, tomato, red onion, kalamata olives, and Feta cheese.
Note: After consulting with a professionally trained chef, I have learned that technically this dressing does not need to be refrigerated. To be cautious, though, we refrigerate ours. Doing so will cause the oil to solidify. I take it out of the refrigerator and set it on the counter when I begin making dinner to give the olive oil time to dissolve and then shake it well before serving.
Earlier today, I was talking with a friend about finding the time to eat healthy. Working, going to school, taking care of kids, a new baby, travelling, sports, volunteering, moving, or just living life….whatever it is that keeps you busy, I think we can all relate. I am definitely trying to take this into consideration with the recipes that I feature here.
Ironic that we were talking about it today, because for me, Sunday afternoon is the ideal time to make up a couple of things to eat for the week. I usually try to make one thing for the kids (muffins, oatmeal bars, granola bars, quick bread, healthy cookies, or a soup or casserole to pack for lunches) and one thing for us (soup, grilled chicken breasts, boiled eggs, chicken salad, chickpea salad, or washed and chopped greens for smoothies and salads, etc). By taking an hour or so to do this, it ensures that we have a few healthy things stocked in the refrigerator all week long for those times when we need something quick.
And like every busy mom since the 70’s, I love finding great Crock-Pot meals for busy days. You just cannot beat the convenience of coming home to a nearly finished dinner! Tonight’s dinner was a new recipe and WOW, was it a hit!! Easy, healthy, and full of flavor.
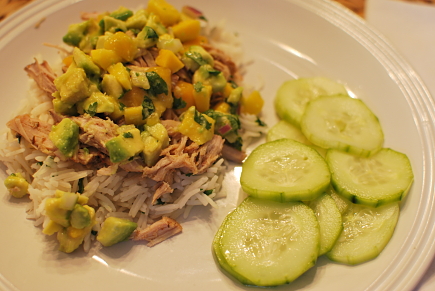
Slow Cooker Jamaican Jerk Pork with Caribbean Salsa
Recipe adapted from Skinny Taste
Jamaican Jerk Pork Ingredients
3 lb pork loin (all visible fat trimmed from the bottom)
3-4 cloves garlic, minced
2 T. jerk seasoning (I used the McCormick Perfect Pinch Jerk seasoning)
1/2 tsp kosher salt
1 lime, juiced
1/2 cup orange juice (store bought or a couple of fresh squeezed oranges)
Caribbean Salsa Ingredients
1 avocado, diced
2 mangos, finely diced (or 1 1/2 cups thawed from frozen)
1 1/2 T red onion, finely diced
2 T. fresh cilantro, chopped
2 T. fresh squeezed lime juice
kosher salt to taste (I used about 1/4 tsp)
Directions
Mix lime juice, orange juice, minced garlic, jerk seasoning, and salt.
The original recipe calls for the marinade to be poured over the pork and marinated in the refrigerator overnight (in a ziploc bag or large covered dish). While this would be a great option for a busy weekday, I missed this step and just added everything to the Crock-Pot before cooking it and it still tasted great.
Add pork and marinade to slow cooker and cook on low for 4-8 hours. Here is where you will need to know your slow cooker a little bit. Even on low, mine seems to cook pretty quickly. Our pork loin was perfect after 4-5 hours.
Remove pork to a cutting board and shred using 2 forks.
Remove liquid from the slow cooker and reserve. Add pork back into slow cooker along with 1 cup of the reserved liquid. Allow this to sit while you prepare the salsa.
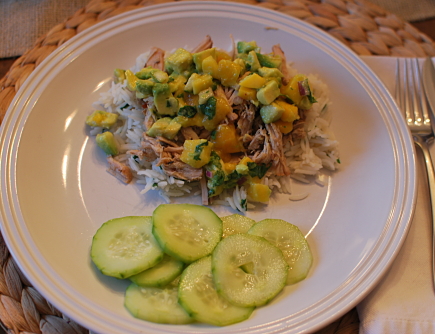
To prepare salsa, add diced avocado, diced mango, chopped onion, cilantro, and fresh squeezed lime juice to a bowl. Gently toss to combine and season with kosher salt.
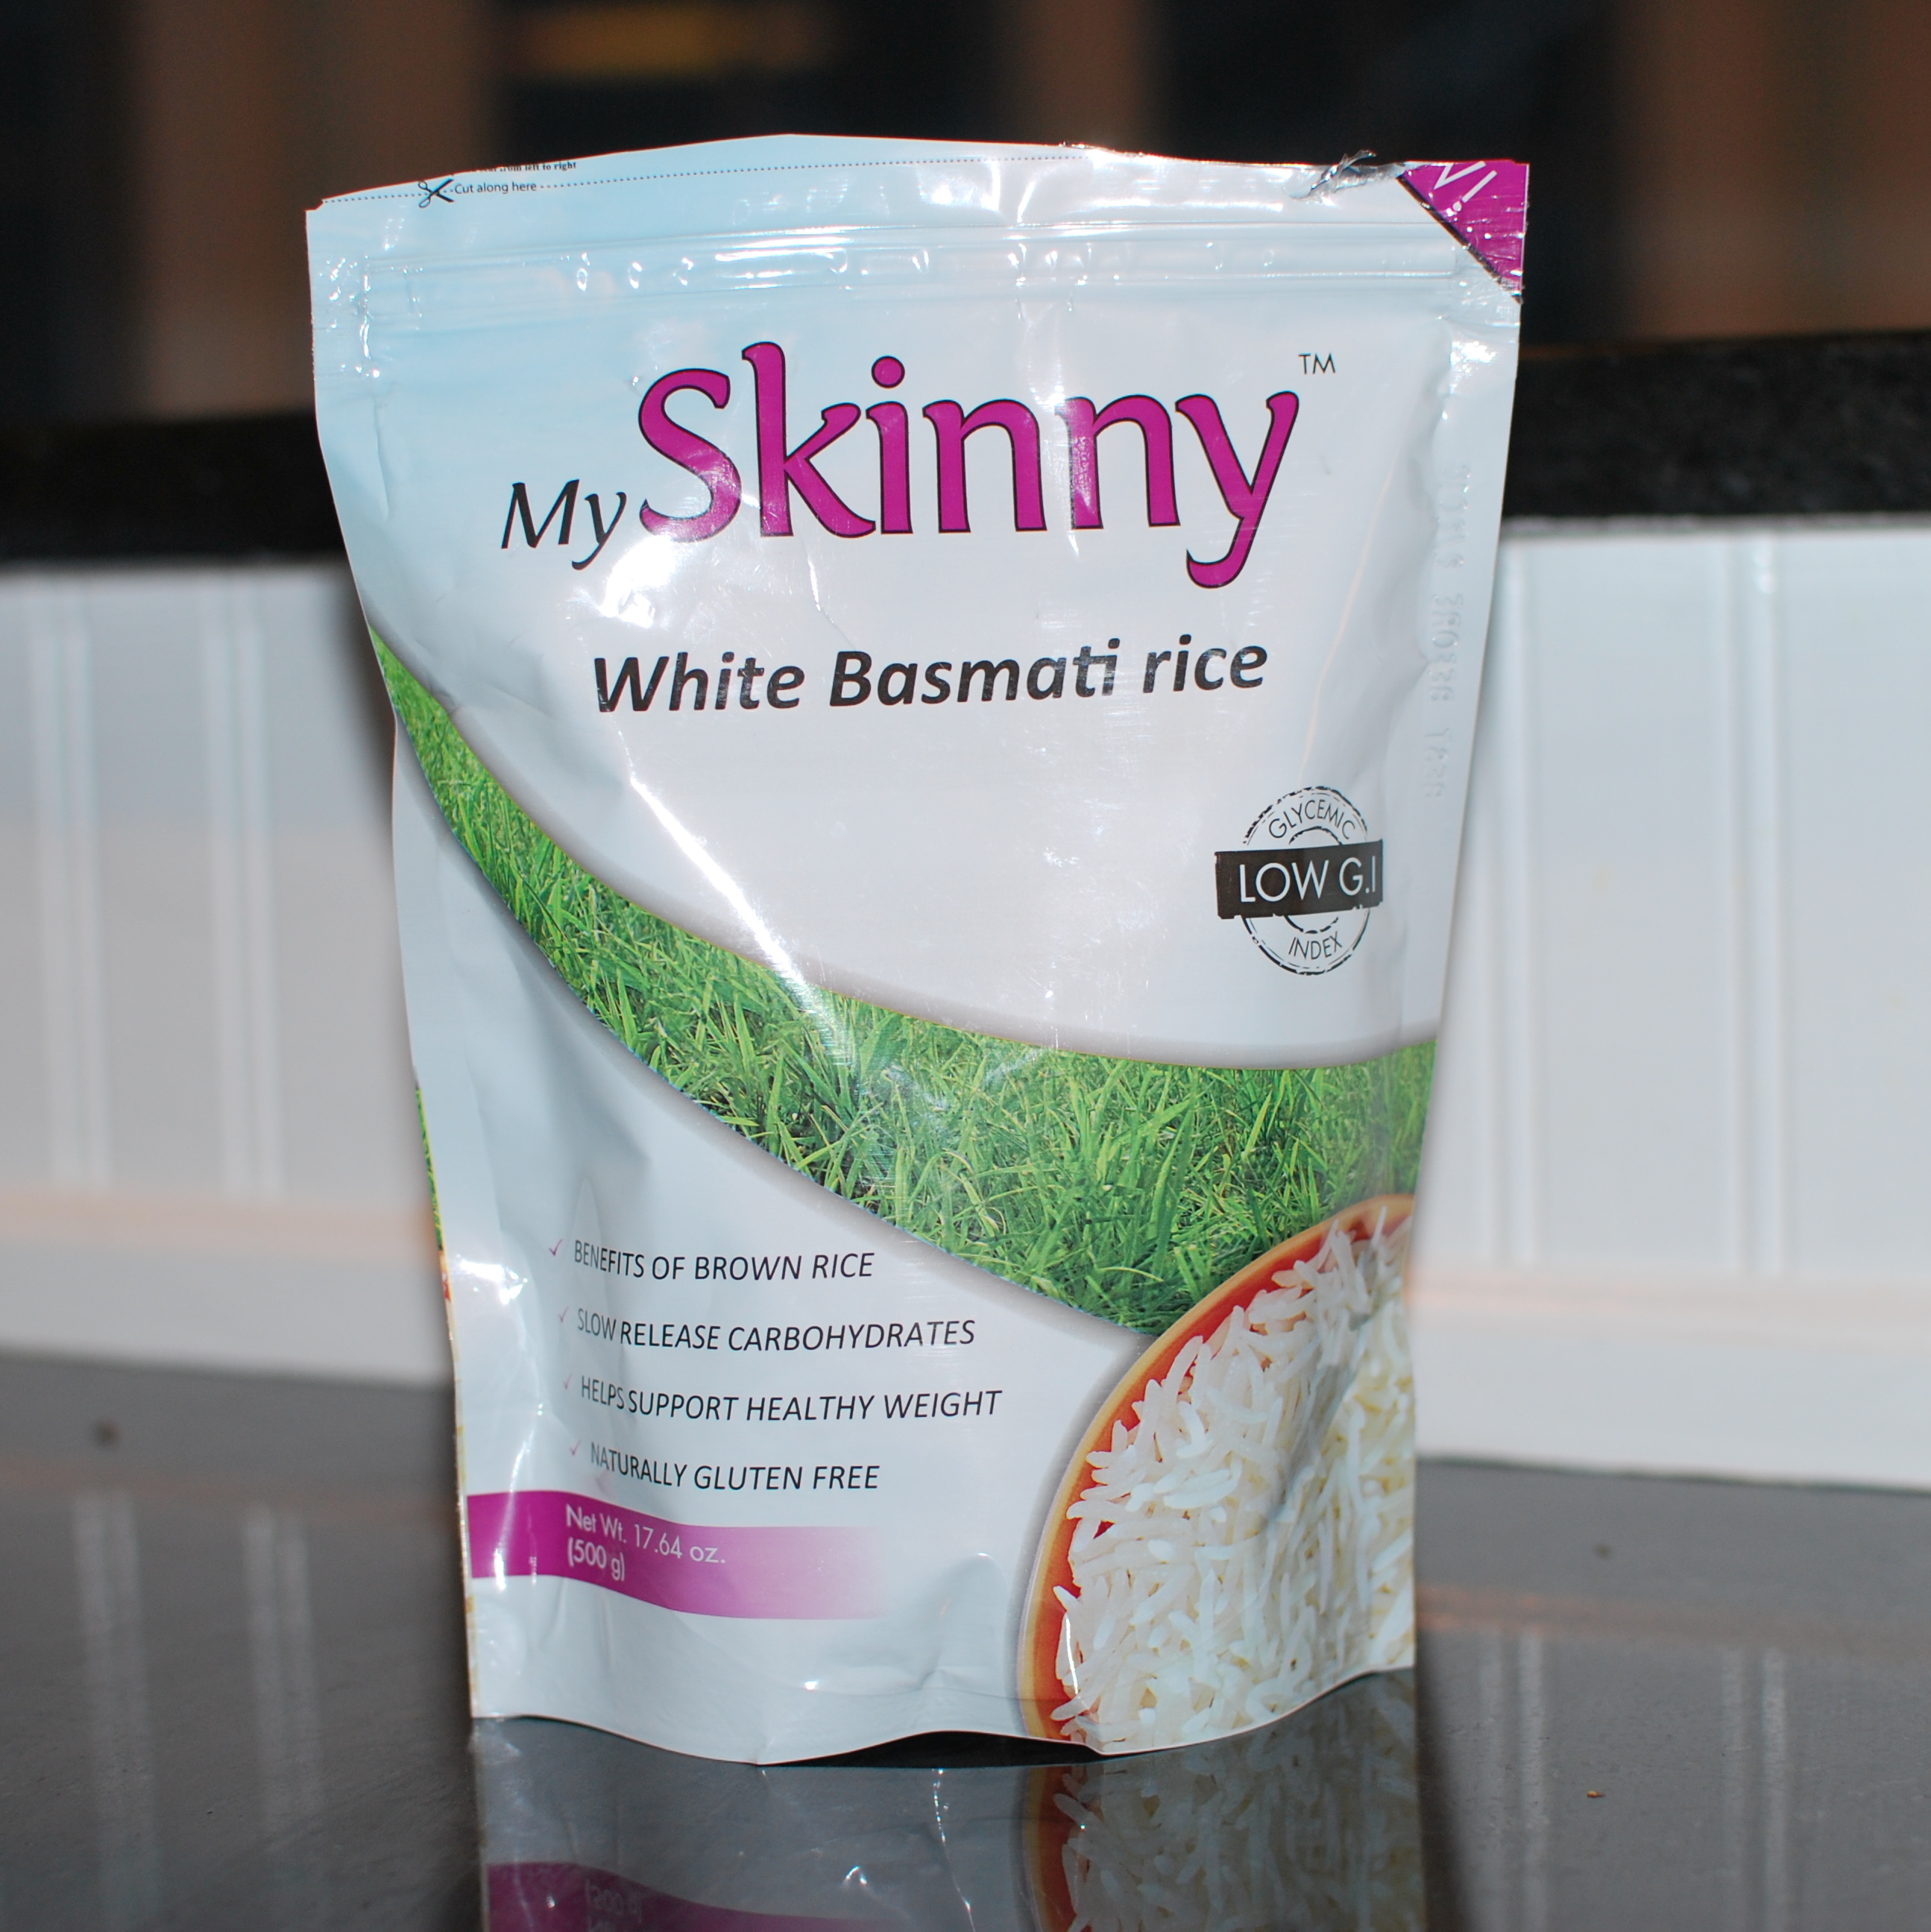
I served this over cilantro lime rice. I made up some basmati rice according to the directions on the package, and mixed it with some fresh lime juice (1-2 T), chopped cilantro (1-2 T), and a pinch of kosher salt.
For a side, I went with some simple marinated cucumbers and they were great together!
Marinated Cucumbers
Ingredients
2 cucumbers, peeled and sliced
1/2 cup white distilled vinegar
1/4 cup cold water
3 T sugar (could sub honey)
1/2 tsp kosher salt
Directions
Mix vinegar, water, sugar and salt. Add sliced cucumbers and toss to coat. Cover and refrigerate for 2-3 hours before serving.
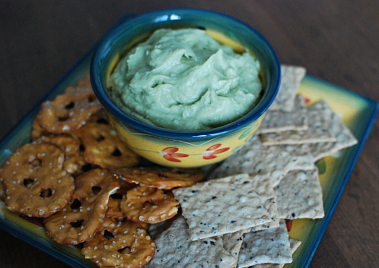
I have been trying to branch out from standard store-bought hummus lately. It gets a bit pricey since we eat so much of it. But also, I just wanted to mix it up a little bit and try something different.
When I saw this dip on Pinterest, I just knew it would be a winner! Not exactly hummus, but more of a hummus guacamole blend. Quick, easy, kid friendly, versatile, and tastes great. What more can you ask for?!?
Avocado and White Bean Dip
First things first, I always wash my produce before I cut into it since this can transfer germs from the outside into the fruit or vegetable that you’re cutting!
Slice the avocado length-wise all the way around and twist to open. Using a large sharp knife, give it a good whack into the pit and twist to remove it (see this youtube tutorial if you’re not familiar with this method of pitting an avocado).
Scoop the avocado flesh out and place it into the bowl of a food processor fitted with the “S” blade. Squeeze the juice from the lime half into the bowl and add the remaining ingredients.
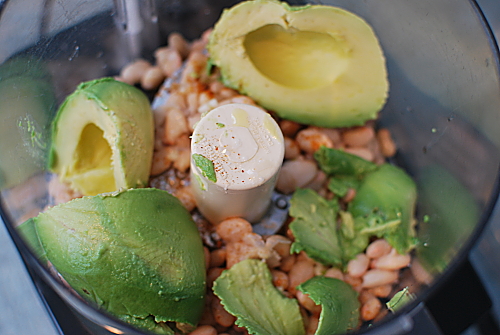
Place the lid on the food processor and process until smooth.
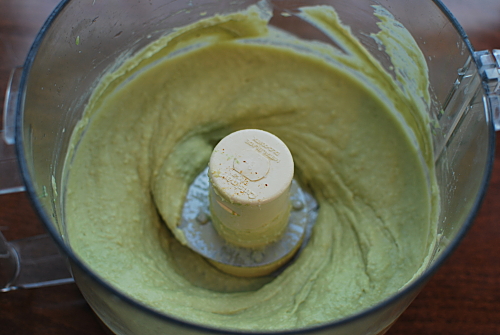
And in less than 10 minutes, you will have white bean and avocado dip packed with fiber (roughly 10 grams per serving!) and nearly 20 different vitamins, minerals, and phytonutrients. I especially like that you can store this dip in the refrigerator for a few days without it turning brown like traditional guacamole.
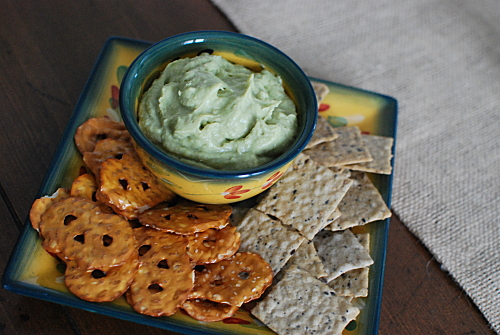
You can serve this with a combination of raw veggies and crackers (I prefer gluten-free rice crackers) or other chips (tortilla, pretzel chips, etc) for an appetizer or well-balanced snack.
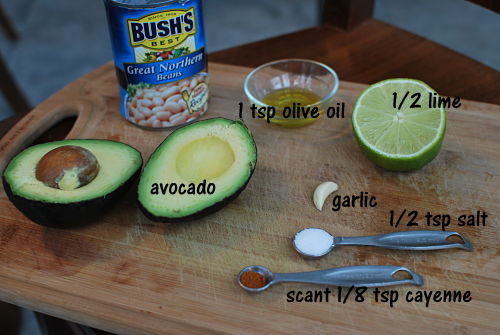
Avocado and White Bean Dip
Ingredients
1 ripe avocado
1 can of Great Northern beans, drained and rinsed well
1 /2 lime
1 tsp extra virgin olive oil
1 clove garlic, minced
1/2 tsp kosher salt
1/8 tsp cayenne pepper (or to taste)
Directions
Add the flesh of one avocado, the juice of 1/2 of a lime, olive oil, minced garlic, kosher salt, and cayenne pepper to the bowl of a food processor fitted with the “S” blade. Process until smooth. Adjust seasonings to your liking (more lime, salt, or cayenne). Serve with veggies, chips, or crackers.
Happy Wednesday!!!
For any new visitors to Healthy Plate Happy Family, this is the one day during the week where I show you a picture of everything that I ate during the day in hopes of showing you how to put “healthy eating” all together.
I have procrastinated putting this post together because of my colossal dinner FAIL. But I guess you will see that I am living real-life here, with chaos and changes in plans and crabby little ones, and sometimes you just have to roll with it!
First up, for breakfast, I took advantage of a nearly empty Almond Butter jar and made a pumpkin version of Overnight Oats in a Jar. Now, Overnight Oats can be made in any container you’d like. I just happen to like taking advantage of the little bit of almond butter that is left to blend in with the other ingredients.
Overnight Oats are a super convenient grab-and-go breakfast. The night before, you simply blend up 1 part oats to 2 parts liquid (usually milk or water) and leave them to combine and thicken up overnight. The flavor combinations and toppings are endless here!
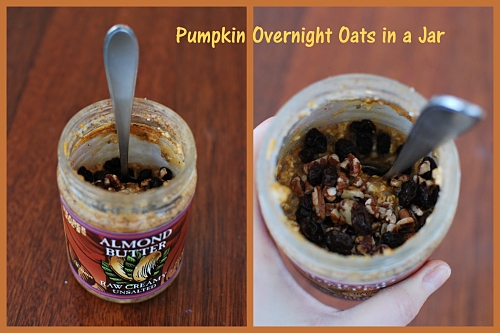
Today, I went with pumpkin because I had a can of it open. Into the jar (last night) I mixed together:
- 1/3 cup old fashioned oats
- 1/3 cup water ( because we were out of almond milk which is what I would normally use)
- 1 T chia seeds (ground flax seed would work too)
- 1/3 cup pumpkin puree
- 1 T. maple syrup
- 1/2 tsp. pumpkin pie spice (just cinnamon would be fine too)
Store this in the refrigerator overnight. This morning, I topped it with some raisins and chopped pecans. YUM!
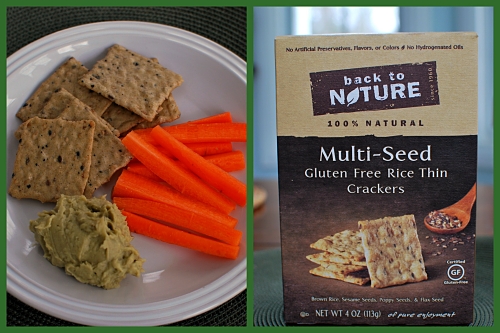
I had a snack mid-morning of carrots, gluten-free rice crackers, and this Avocado and White Bean Dip. It is really tasty – like a combination of hummus and guacamole. And it is usually a little more green, but I made this a couple of days ago. Perhaps the blinding brightness of the carrots will make up for it!
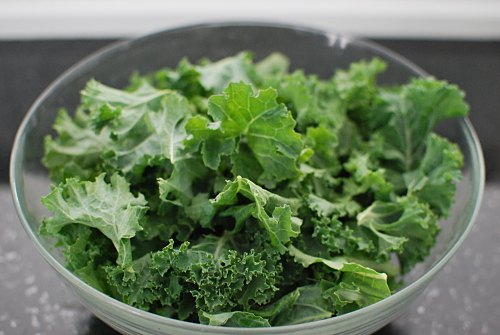
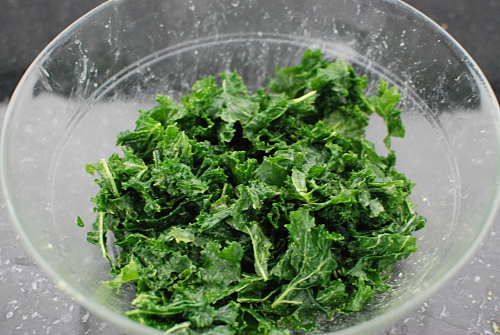
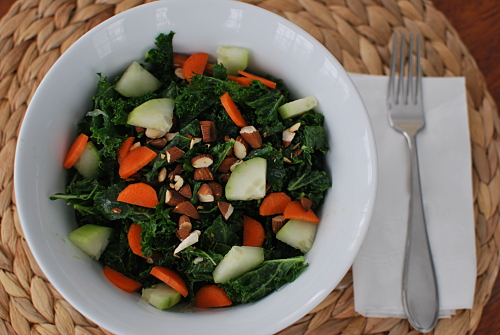
After a marathon grocery shopping trip, I came home and made lunch. Today it was a massaged kale salad, one of my favorite salads. This salad took me some time to warm up to. In the beginning, I would make a smaller portion and could eat it as long as it was paired up with a sandwich or soup. Now, I’ve grown to really like it and it can be my whole lunch. I love this because of the powerhouse of nutrition – Vitamins A, K, C, calcium, fiber and loads of antioxidants in the kale, plus a little healthy fats from the avocado and olive oil to help absorb the nutrients. And I haven’t even gotten to the add-ins!
Start with a huge bowl of washed kale (stems removed, leaves torn into bite-size pieces).
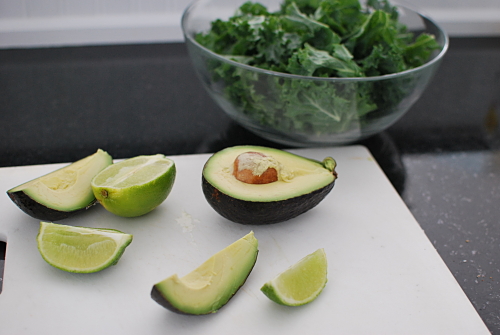
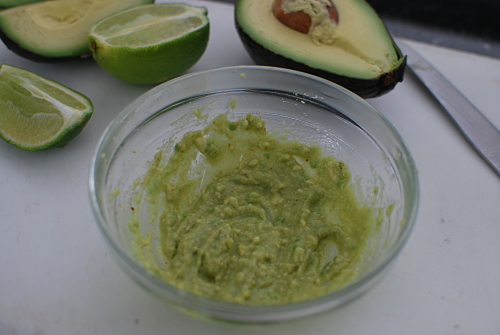
Make the dressing with a small wedge of avocado (a little less than 1/4 of an avocado), juice from a wedge of lime, 1 tsp. olive oil, a pinch of kosher salt, and a sprinkle of cayenne pepper. Did you get all of those precise measurements?!?!?!?
Mash them up until it sort of looks like guacamole.
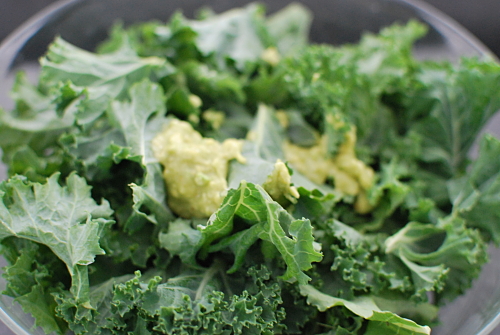
Dump the avocado mixture into the bowl of kale, and with CLEAN hands, massage the dressing right into the kale leaves. This will tenderize the leaves making them much easier to eat and more palatable.
Then your huge bowl of kale will be reduced to a more reasonable looking portion like this.
Taste and adjust seasonings. I usually like to add an extra squeeze of lime to give it more of a tangy flavor. At this point, you can cover the salad and let it sit for a little while. But I don’t recommend refrigerating it for a long period of time, or it will get pretty soggy, at least for my tastes.
Top with lightly toasted nuts (today was almonds), carrots, and cucumbers. A lot of times, I’ll add diced apples or dried cranberries in as well for a little sweet contrast.
So I realized this afternoon that Darren and Hailey were going to be gone for the rescheduled Daddy Daughter Dance, so I would be having a little dinner date at home with Jake. But then he wasn’t feeling well and just wanted to play Monopoly and snuggle on the couch. Next thing I know, he was hungry for food RIGHT NOW, and I was scrambling to pull some dinner together. I could tell he wasn’t feeling well because he didn’t really want any of his usual favorites. He wanted grapefruit, then a homemade popsicle (pureed watermelon and strawberry), and then asked for a treat or a smoothie. At this point, I was starving too and I also felt like Jake needed a little more substance. So I decided to scrap my plans for a Greek salad and falafel, and make the treat/smoothie/dinner all into one dish!!!
Behold, the Chocolate Covered Cherry Smoothie!
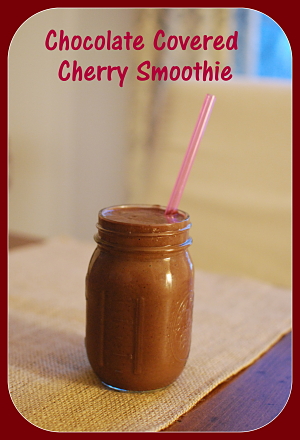
Believe it or not, this thing was so filling that it turned out to be my dinner! Maybe dinner wasn’t a fail afterall?????
Chocolate Covered Cherry Smoothie
- a little less than half of an avocado (1/4 to 1/2 of an avocado would work)
- 1 1/2 cups unsweetened almond milk
- 2 T raw cacao powder (or cocoa powder would work)
- 1 huge handful of spinach
- 1 whole banana, frozen in chunks
- 1 1/2 cups frozen sweet cherries (this is also awesome with strawberries!!)
Mix all ingredients in a blender until super smooth and creamy. Add more almond milk to thin or ice cubes to thicken, as necessary. This made 2 decent size portions. You could scale back to 1 cup of cherries/strawberries, 1 T. cacoa, and 1 cup of almond milk for an individual portion.
So there you have it for this Wednesday!
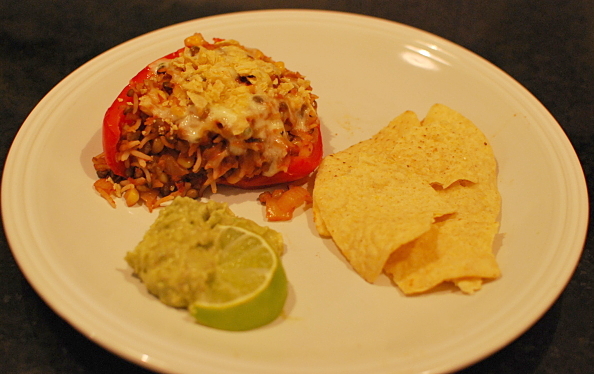
I am not going to lie….our Meatless Monday dinner was AWESOME tonight! I love when healthy meals turn out really, really GOOD! It is a Southwestern (and vegetarian) spin on classic stuffed peppers.
Some food for thought – bell peppers are the #3 most pesticide contaminated produce on the Environmental Working Group’s Shopping Guide to Pesticides in Produce, with up to 15 different pesticides found on a single pepper. If you are looking to reduce your exposure to the toxins in pesticides, you can refer to the list of the “Dirty Dozen” fruits and vegetables, and try to buy these fruits and vegetables organically grown, if possible.
Start with some bell peppers (we prefer the red, yellow, or orange for this dish). Cut the stem out of the center and remove the seeds and membranes inside.
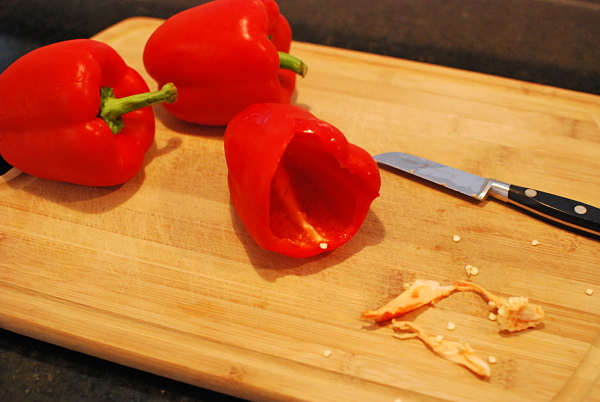
I prefer to serve pepper halves so I sliced each pepper in half from the top down.
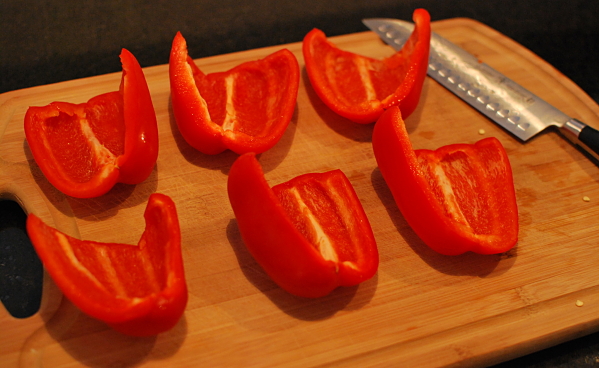
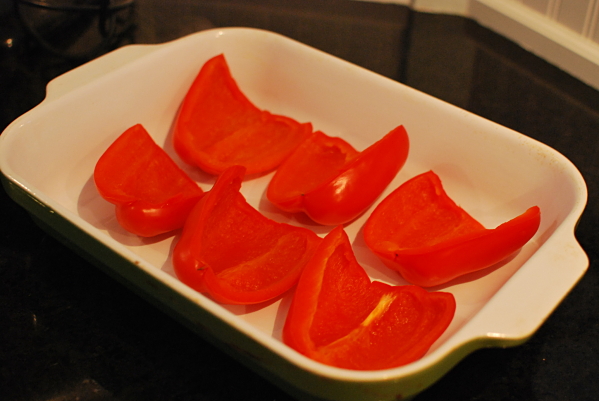
In a large stock pot, boil the peppers for 5 minutes. This will ensure that they are perfectly done, and not “crunchy” after baking. When peppers are done, remove from water with tongs and place into 9 X 12 casserole dish. Sprinkle with a pinch of kosher salt.
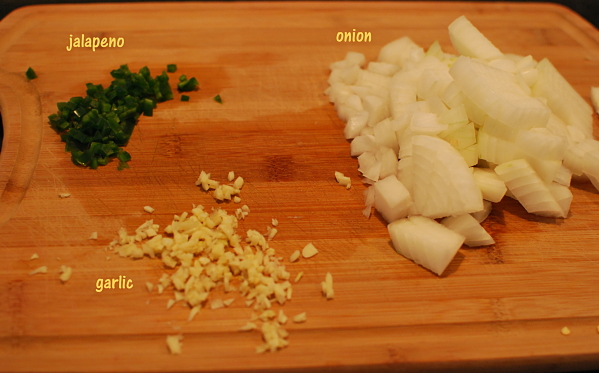
Chop 1 onion, 2 cloves of garlic, and a jalapeno.
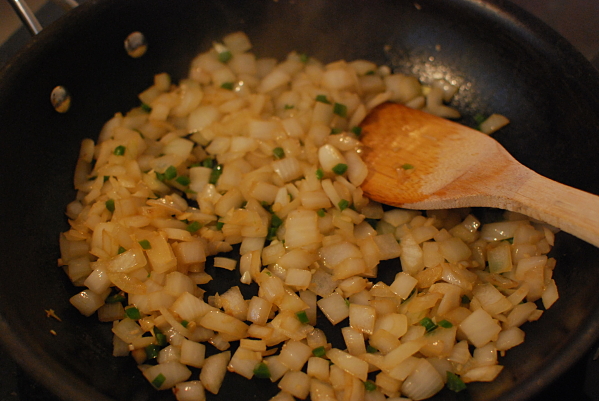
In a large skillet, saute onion, garlic, and jalapeno in 2 tsp. of olive oil over medium heat for 5 minutes, until veggies are softened.
Add in 1 can of fire roasted tomatoes, 2 cups cooked rice, 1 cup of frozen corn, 1 1/2 cups of cooked lentils, 1 tsp. ground cumin, 1/8 tsp. of ground chipotle pepper, and 1/2 tsp. salt. Mix well and let simmer for 5 minutes.
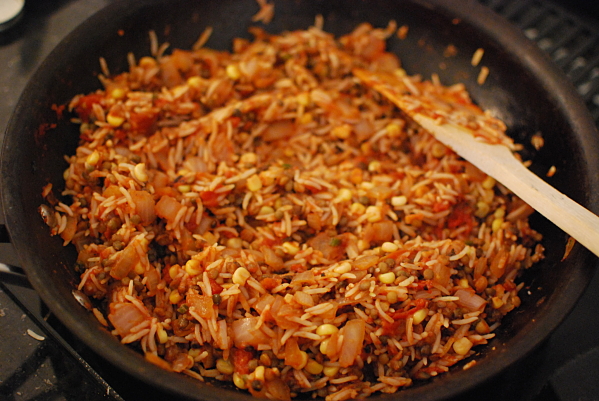
Scoop rice mixture into peppers. This amount of rice would fit nicely into 4 whole peppers (8 halves) but I knew 3 peppers would be plenty for us. Any leftover rice can be baked separately in a small dish.
Top each stuffed pepper with a couple of tablespoons of shredded jalapeno pepperjack cheese and crushed tortilla chips.
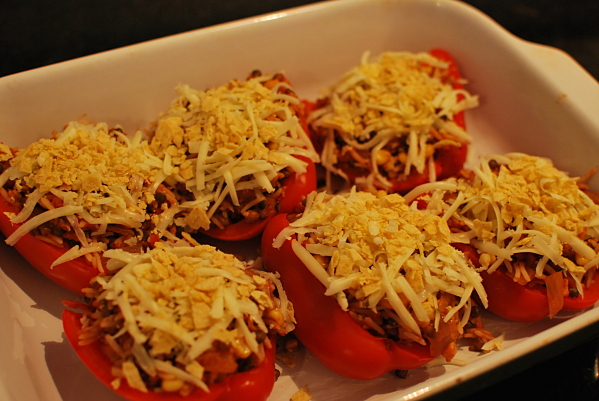
Bake uncovered for 25 minutes. Serve with guacamole and extra chips on the side.
Southwestern Stuffed Peppers
Ingredients
3-4 bell peppers (we prefer red, yellow, or orange)
1 cup rice (cooked according to directions on package, yielding appx. 2 cups)
1 medium onion, chopped
1 jalapeno pepper, seeds and ribs removed, finely diced (or substitute mild green chilies)
2 cloves garlic, minced
2 tsp. extra virgin olive oil
1 cup frozen corn
1 1/2 cups cooked lentils (I buy them pre-cooked at Trader Joes. I believe you can also buy them canned similar to beans)
1 can fire roasted tomatoes
1 tsp. ground cumin
1/2 tsp kosher salt
1/8 tsp chipotle chili powder
Topping Ingredients
1/2 cup shredded pepperjack cheese
crushed tortilla chips
“quick guacamole” (1 mashed avocado with a squeeze of lime and pinch of salt)
Directions
Preheat oven to 350 degrees.
Cook rice and lentils as necessary.
Bring large stockpot full of water to boil.
Remove stems, seeds, and membranes from peppers. Slice in half vertically if desired.
Boil peppers for 5 minutes. Remove with tongs and place into a 9 X 12 casserole dish. Sprinkle with kosher salt.
Heat 2 tsp. of olive oil in a large skillet over medium heat (being careful not to let it smoke). Saute chopped onion, jalapeno (or green chilies), and garlic for 5 minutes, until softened.
Add into skillet 1 can of fire roasted tomatoes, 2 cups cooked rice, 1 cup frozen corn, 1 1/2 cups cooked lentils, 1 tsp. ground cumin, 1/2 tsp. kosher salt, and 1/8 tsp. chipotle chili powder. Mix well and let simmer for 5 minutes.
Stuff pepper halves with rice mixture. Top with 2 T. shredded pepperjack cheese and some crushed tortilla chips.
Bake uncovered for 25 minutes.
Serve with simple guacamole and additional chips, if desired.
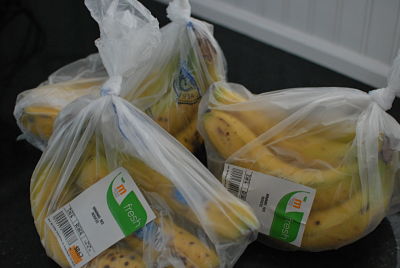
Some people are all about the awesome deals at outlet stores. Some are really into picking up a treasure at a thrift store or garage sale. But me? I love scoring a deal at the grocery store!
I especially love the clearance produce section! Its a great place to pick up perfectly good produce for a fraction of the price (since you rarely see coupons for healthy whole foods or fresh fruits and vegetables). Some of the staples I can usually find at our store are onions, citrus fruits, and mini peppers. We have potatoes and apples a lot as well, but I prefer to buy organic versions of those.
One of my favorite things to find??? Bananas!!!! These are one of the few fruits that I am perfectly OK with eating non-organic since you don’t eat the outer part of the fruit. And even if they’re a little past their prime, they are perfect for cooking or slicing and freezing for smoothies and other frozen treats.
So this week when I found bags of clearance bananas, I cleared the shelves and brought home 7 pounds of bananas for a little over $2.00!
And I knew exactly what I was going to do with these guys!! I’ve been eyeing the Bananas Foster Baked Oatmeal at Oh She Glows. My kids love oatmeal and I thought this would be a little bit more special than their typical weekday morning oatmeal topped with raisins or thawed frozen fruit.
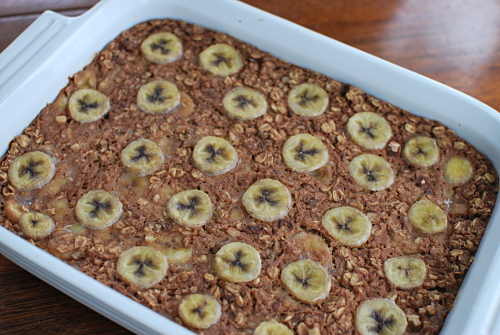
This was SO good – like a perfectly warm and cozy treat, very filling and not overly sweet. I love all of the healthy swaps from traditional bananas foster including coconut oil for butter and a maple syrup for the brown sugar. This will definitely be something that I make often!
Enjoy and have a wonderful weekend!!!
Bananas Foster Baked Oatmeal
Adapted from Oh She Glows
Oatmeal Ingredients
1 1/2 cups rolled oats
1/2 cup oat flour (finely ground oats, I’ve started grinding mine in a coffee grinder instead of the blender)
2 tsp. cinnamon
1 tsp. baking powder
1/2 cup walnuts, chopped
2 1/2 cups unsweetened, plain almond milk
Bananas Foster Ingredients
4 bananas, sliced (or chopped into small pieces if you prefer)
1 T. coconut oil
2 T. real Maple syrup
3 T. rum
Sprinkle of cinnamon
1 tsp. pure vanilla extract
Topping
1 banana, thinly sliced
Directions
Preheat oven to 350 degrees and lightly grease a casserole dish (I used coconut oil).
Combine all oatmeal ingredients in a large bowl and set aside while you prepare the bananas foster.
Add coconut oil, maple syrup, and rum to a cold skillet and heat over medium low heat. As the coconut oil begins to melt, whisk to combine ingredients. When mixture is bubbling, add in bananas and sprinkle with cinnamon. Saute for about 5 minutes, reducing heat if necessary. Remove from heat and stir in vanilla extract.
Stir bananas foster mixture into oatmeal and pour into casserole dish. Place sliced bananas on top and bake for 40-45 minutes.
Every Thursday night for the last 5 or 6 years, we have made homemade pizza for dinner. I’m not really sure where this little ritual came from, but it definitely makes my menu planning for the week a little bit easier!
Since this Thursday was Valentine’s Day, we had some fun with it and made….

It’s a lot of fun because we can each personalize our pizzas with our own toppings. Hailey’s standard is garlic butter (no red sauce!), cheese, and veggies. Jake is a pepperoni guy. Darren and I mix it up.

I almost always make mine on an Ezekiel 4:9 pocket bread (pita) and usually top it with mostly veggies and just a sprinkle of cheese.

This one was Mediterranean Pizza with red sauce, lots of spinach, chopped red onion, kalamata olives, sundried tomatoes, and a little bit of crumbled feta cheese.
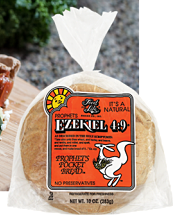
Ezekiel Pita Pockets – I LOVE these things!!!
I buy these at our local health food store where they are kept in the freezer. They are only $1.99 for 6 of them and make the best pizza crusts! They are made of all organic ingredients including whole wheat flour, carrots, barley flour, millet flour, lentil flour, spelt flour, soy flour, fresh yeast, and sea salt. They have 100 calories, 0.5 grams of fat, 21 carbs, 4 grams of fiber, and 7 grams of protein.
I just take one out of the freezer and top it and put it in the oven for about 10 minutes or so, depending on the toppings.
Either way that we make them, pizza night is always a favorite around here, especially when you get to eat a whole heart-shaped pizza!

Homemade Pizza Crust
1 1/2 cups water (heated to 110-115 degrees or a little over a minute in the microwave)
1 tsp honey
2 1/4 tsp yeast
1 tsp salt
2 T. extra virgin olive oil
3 1/2 cups flour, plus additional as needed (see note below)
Heat water to 110-115 degrees (important to be warm enough to activate the yeast but not too hot to kill it) and put into a large bowl. Stir in honey. Sprinkle yeast over top of the water and let stand for approximately 10 minutes until it is foamy on top (this is “proofing” the yeast and lets you know that its active) Add in salt, olive oil, and 3 cups of flour. Once everything is incorporated, turn out onto a floured mat. Knead dough and add more flour until the dough is slightly sticky but not tacky. Knead for about 5 minutes and then place into a well-oiled bowl. Cover with a clean dish towel and place in a warm dry area to rise (I set it in a corner of the counter near the oven). Dough can be ready in as little as 1 hour but I prefer to let the dough rise for closer to 2 hours or more.
Preheat oven to 425 degrees (we have found through trial and error that 400 degrees on convection is the perfect temp for us). Turn dough out onto the floured mat again and separate into 2 large crusts or 4 small crusts (great for individual pizzas) and roll out with a flour-dusted rolling pin. Place on an oiled pan and pre-bake for 7-8 minutes. Add desired toppings and bake for an additional 8-10 minutes until pizza is done to your liking. During the final baking stage, we prefer to cook the pizzas directly on the rack.
A note on flours – we originally started making these with all whole wheat pastry flour (or white whole wheat flour) as I wanted a 100% whole grain, healthy pizza crust. This is not going to give you the traditional pizza crust flavor that most people are expecting. You can try half whole wheat flour and half white flour to start. For us, I now like to use 1 cup white flour, 1 cup whole wheat pastry flour, and 1 cup of whole grain spelt flour (a grain similar to wheat). It may take some experimentation to see what you like.
Glad to have you back for another What I Ate Wednesday!
Yesterday’s post felt so BLAH to me!!!! I think its a lot easier for me when I write during the day but usually its just so hard to find that time!
Speaking of time…..I just somehow did not seem to have enough of it today!! And I can tell I must be settling into this blogging thing because I really and truly did not plan out a single thing that I was going to eat today. The only thought that goes into my WIAW’s are to try to mix it up to show you different things (when in reality I am a total creature of habit!!) and also to make sure to snap a picture.
So the theme of today’s eats – on the fly!
Breakfast was totally on the fly. I had a million things I had to get done in the three hours Jake was at school. I am not usually very hungry early in the morning so I basically just made something super quick so that I wouldn’t get hungry while running errands.
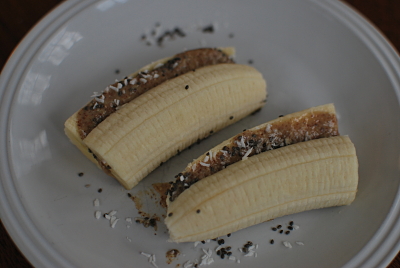
This is a banana with raw almond butter (from my imported Trader Joe’s stash), unsweetened coconut flakes, and chia seeds. This breakfast apologizes for not being very photogenic. But I know I must be onto something when both of my kids had this as an afternoon snack today!
Lunch was a bit of a scramble to pull something together. I started with some of the Butternut Squash Apple Curry soup from Monday. I paired it up with a repeat from last week – the chickpea “mock tuna” salad on Ezekiel bread. This is exactly why I take the time to make up things like this ahead of time (soup, chickpea salad, oatmeal bars, etc). Lunch was thrown together in less than 10 minutes, including making Jake’s lunch!

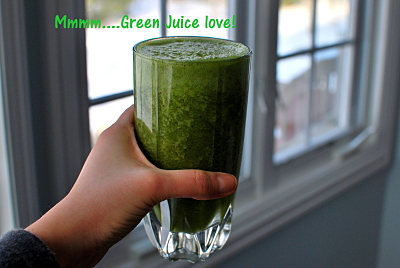
For my afternoon snack, since I didn’t have anything planned out of course, I kind of went over what I’d eaten today to see what I felt like I was missing. Decided on some more fruits and veggies, specifically GREENS! So I threw together one of my green juice/smoothie concoctions. This one had a handful of kale, handful of romaine, celery, 1/3 cucumber, an apple, 1/2 banana, and a handful of frozen grapes. I was surprised at how much the grapes mixed up the usual flavor. I know this picture doesn’t appeal to many, but its just how I roll! I swear by juice and smoothies like this for awesome energy every day!!! To me, they are a total pick me up!!
Good thing I was re-fueled because my afternoon included a whole lot of this………..

Dinner, again, was completely on the fly. We had planned to make jumbalaya but then I realized someone had used the leftover andouille sausage from the gumbo on Superbowl (I’ll give him some credit for using it very creatively on a pizza ;)). So I did a quick pantry/fridge check and came up with a mexican-inspired soup, similar to a tortilla soup. This was made completely with what I had on hand and I did not follow a recipe. I have to say it turned out pretty good. I realized that this is something that I could keep the ingredients on hand at all times to easily add this to my rotation of “throw together” dinners.
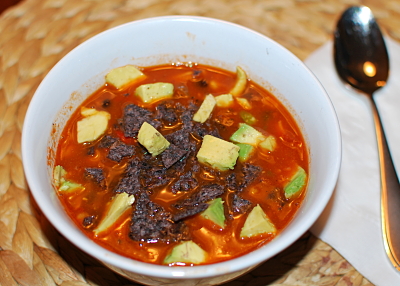
Mexican Chicken and Black Bean Soup
Ingredients
1 onion, chopped (could be chopped and frozen)
1 red pepper, chopped (could be chopped and frozen)
1 jalapeno, seeded and finely chopped
2 cloves garlic, minced
3 cups vegetable stock (chicken stock would work too)
1 can fire roasted crushed tomatoes (Muir Glen are organic AND bpa-free!)
shredded chicken (we had about 1 1/2 pieces of leftover grilled chicken)
1 can black beans (pinto beans would work too)
1 cup frozen corn (canned would work too)
2 tsp. ground cumin
1 tsp. chili powder
Toppings: shredded cheese, crushed tortilla chips, sour cream, avocado, cilantro – whatever you have!
Directions
In a large stock pot, saute the onion, pepper, jalapeno, and garlic in some olive oil over medium heat until softened. Add in crushed tomatoes, broth, shredded chicken, beans, corn, and seasonings and simmer for 20 minutes. Garnish with crushed chips (if you have leftover crumbs you can store them in the freezer for this purpose!), cheese, avocado, and/or cilantro.
Another option that I may try out would be to omit the chicken and use two different types of beans and a grain like rice or quinoa.
Well, that wraps it up. Happy Valentine’s day tomorrow!
I had every intention of actually getting this post up on Monday, the one day during the week that I commit to making a vegetarian dinner for our family. But an interesting opportunity came up that changed up my plans at the last minute. I found out that a local chiropractor was showing the documentary “Doctored” so of course I needed to take advantage of the opportunity to socialize with some of my fellow health nuts!!

Overall, I liked the movie and found some of the facts presented to be very eye-opening. For example, did you know that “although the U.S. makes up only 5% of the world’s population, we consume over 50% of all the world’s pharmaceutical drugs?” I think that is shocking!
The movie is centered on the chiropractic profession and their struggle against “big business” and the American Medical Association. Although I felt like the movie lost focus near the end, they still managed to make the point that there are very effective alternative treatments available for many of the pains and illnesses that plague us. Whether your medications and current approach aren’t working, or you would like to explore an alternative to prescription drugs and surgery, it is important to educate yourself of other options besides our traditional Western medicine. Our family, personally, has had amazing success with chiropractic care. I won’t go into too much detail here, but years ago, we successfully treated our daughter’s asthma diagnosis through chiropractic adjustments. I am a firm believer in the healing energy within our own bodies.
It was incredible to see the examples of cases they presented where debilitating chronic pain was resolved through something as simple as chiropractic adjustments as well as proper diet and nutrition.
Proper nutrition….my favorite subject.
So lets get going with this healthy vegetarian-friendly soup! Its Butternut Squash Apple Curry soup based off of this recipe from one of my favorite classical chefs, Ina Garten, better known as the Barefoot Contessa.
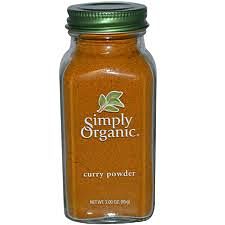
I first made this recipe because I wanted to experiment with curry powder in a recipe after learning some of its health benefits. Curry powder is a mixture of spices including turmeric and curcumin. Turmeric has been found to reduce inflammation of the joints. Some studies suggest that turmeric may also help protect us against cancer, heart disease and even Alzheimer’s disease. Studies done at one of the world’s most renowned cancer centers, MD Anderson Center in Texas, have shown that curcumin seems to turn off genes that can trigger the onset and spread of breast cancer. It also shows some promise, in a handful of patients, in stabilizing pancreatic cancer. Who knew all of that power was there in a little spoonful of spices???
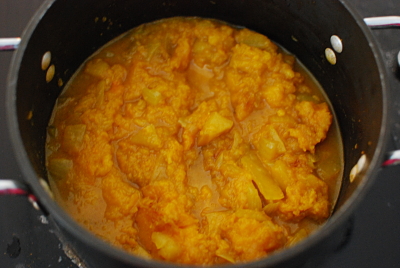
I like to start this recipe ahead of time by roasting a butternut squash the night before I plan to make the soup (usually while our dinner is cooking or afterwards, while the oven is still hot). Slice the squash in half and remove the seeds. Brush a little olive oil on the cut surfaces and place it cut-side down on a baking sheet. Roast at 350 degrees for an hour (up to an hour and a half depending on size), until the squash is golden and soft. Once it has cooled, scoop the flesh of the squash from the skin and store it in the refrigerator until you are ready to proceed with the soup. The soup comes together quickly after the squash has been roasted!
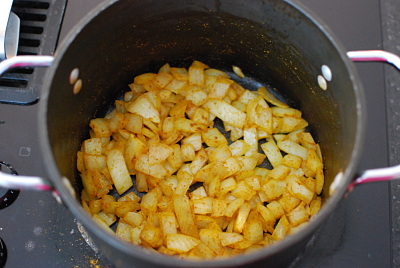
Next, saute a chopped onion and 2 tsp. of curry powder in olive oil, grass-fed butter, or ghee. If it starts to dry out, add a little bit of vegetable stock – this is a great way to cut back on the amount of butter and oil used.
After about 10 minutes, add in 2-3 peeled, cored, and chopped apples and 2 cups of vegetable stock. Let this simmer for about 8 minutes until the apples are soft.
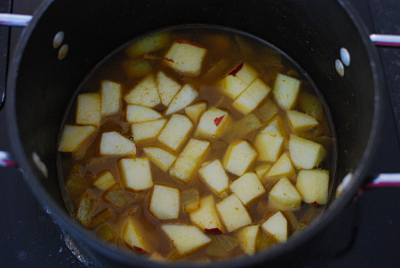
Add in the roasted and peeled butternut squash, 1/2 tsp. kosher salt and 2 cups apple cider. To get the right taste, be sure to use cider and not apple juice.

Mix to incorporate everything and let this cook for a few minutes until the squash is heated.
Puree with an immersion blender and adjust seasonings to taste.
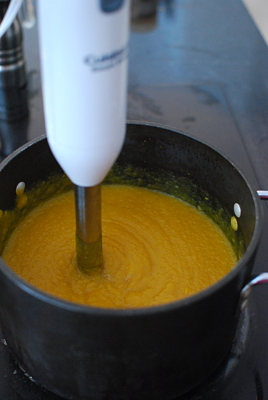
If you want it spicier, add more curry. If it doesn’t taste sweet enough to you, add a bit more apple cider. The flavor of the soup can vary quite a bit based on the size and flavor of the apples and squash. Also, you can adjust the thickness of the soup to your liking by adding more broth, cider, or even water. When I reheat this soup for lunch later in the week, I always need to thin it out more with about half a cup of liquid.

Paired with some good bread and a salad of mixed greens, pears or apples, red onion and toasted nuts, it makes a great vegetarian lunch or dinner and is a great use of seasonal produce.
Butternut Squash Curry Soup
Recipe adapted from here
Ingredients
1 large butternut squash (roasted ahead of time, cut-side down on a baking sheet at 350 degrees for about an hour)
1 sweet onion, chopped
2 tsp. olive oil, butter, or ghee
2 tsp. – 1 T. of curry powder, depending on how spicy you want it
2-3 apples, peeled, cored, and chopped
2 cups vegetable stock (optional, can just use water)
1/2 tsp. sea salt or to taste (adjust as necessary)
fresh ground black pepper
2 cups good quality apple cider
Directions
Roast butternut squash ahead of time. Cool and scrape squash from peel. This can be done 1-2 days in advance and kept in the refrigerator.
Heat a dutch oven or stock pot over medium heat. Add olive oil and/or butter to pan. Saute chopped onion and curry powder for about 10 minutes, until onions are soft and translucent. If onions begin to stick, add a splash of vegetable stock or water to the pan.
After 10 minutes, add peeled, chopped apples, cooked butternut squash and 2 cups of water or vegetable stock and simmer covered over low heat for another 10 minutes.
Remove from heat. Add 1 cup of apple cider, 1/2 tsp. salt and some fresh ground pepper and puree with an immersion blender. Alternatively, you can puree the soup in a blender in batches. Add up to an additional cup of apple cider. Taste and adjust seasonings as desired. This soup tastes better after it sits and flavors have developed.